Great Eagle Tips and Tricks
-
raccoonhat

- Posts: 124
- Joined: Fri Aug 30, 2013 6:26 am
- Location: Western Europe
Re: Great Eagle Tips and Tricks
Good point. The steam gun can only do one point of damage each turn...so unless you are in front of the steam cannon, you're safe.

Re: Great Eagle Tips and Tricks
While I agree that Point 4 is the most consistently import use of Great eagles, perhaps we can add the below scenario to the tactica? I love it because your Great eagles do not even have to die!
https://flic.kr/p/np2ZyQ
As you can see, the horde is in the front arc of both GE's, but cannot complete a charge against either one of them because the required wheel would cause the horde to hit the flank of the opposite eagle first resulting in a failed charge.
As with any of the scenarios using Great Eagles to block the path of enemy units, be aware of the potential for combat characters to charge out solo from the unit to take out the eagle, while the main unit swift reforms.
This is a great reason to have bolt throwers in the army. Most combat charcters will not be able to risk such a charge if they can simple by shot down after wiping out your chaff unit.
My painting and army blog [url]http://www.ulthuan.net/forum/viewtopic.php?f=5&t=38926[/url]
-
de kaasboer

- Posts: 195
- Joined: Wed Feb 09, 2011 10:17 am
Re: Great Eagle Tips and Tricks
@arathel:
i think one of the reasons this tactic is not in there is because it is often frowned upon to position units in such a way that the opposing unit can not charge at all due to the charge mechanics. similar to putting a unit of skirmishers in front but only just in line of site and facing away from the blocked unit, resulting in an automatic failed charge. i know these " tactics" are straight out forbidden in many comp systems like ETC.
gr,
J
Re: Great Eagle Tips and Tricks
Besides being beardy, the rule book has a line that if there is no way to complete the charge without contacting both units, it can declare the charge on both units. In which case the unit would move into contact and the eagles would close the door. At that point you might as well just save the second eagle.
-
Bashtrigger
- Posts: 164
- Joined: Sun Mar 23, 2014 4:53 pm
Re: Great Eagle Tips and Tricks
Nope, what you're talking about doesn't work, he'd charge one Eagle, close the door untill he can't wheel any further (other Eagle in the way) and then your Eagle will have to close the door. He'll kill that Eagle, and afterwards overrun in the second Eagle and you'll be out of Eagles sooner than you'd like.
I've never ever seen a situation where the multicharge is actually allowed, there's always a way to charge just the one unit.
I've never ever seen a situation where the multicharge is actually allowed, there's always a way to charge just the one unit.
Re: Great Eagle Tips and Tricks
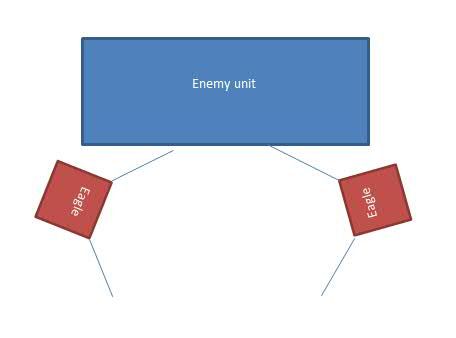
But the double block can actually be trickier than that. The diagram linked by Arethel is not the cheesiest of it: you can actually place the Eagles so they are not looking at the unit they block:
http://i1050.photobucket.com/albums/s41 ... bf0315.jpg
The enemy has to charge the front of the eagles, but they can't even touch it. Thus, they can't close the door, nor can any eagle do it, which makes the charges illegal!
That's what a strict interpretation of the rules says. Not that I'm in favour of it actually - I'd actually allow a flank charge on the eagles in this specific case, but I'm only playing in a friendly setting, so...

Re: Great Eagle Tips and Tricks
I cast Restoration upon this post. Well some of it at least. Tried to restore all the images to this post so at least it's archives correctly.
Collinisimo wrote: ↑Tue Aug 24, 2010 2:45 am Due to requests on my Gaming Blog forum, I have decided to throw together an Eagle Tactica. In my list (see sig), I take a grand total of 4 GEs, and after the success I have had with them in 8th Ed., I doubt I will take any less at this point. They have almost been the stars of my team, even though I don't think a single one has lived all the way through a game of mine. Therefor, I would love to share some wisdom with everyone here on Ulthuan regarding Great Eagles.
The following are five different tricks I have picked up in my 8th Ed. games. If anyone else has any eagle tricks, please post them, as I am sure that these are only a few of the many wonderful different things you can do with eagles.
The most recent additions are added in blue. I will be adding in tricks thought up by other people, and adding their name to the contribution list, which is listed below. So far we are up to 9 eagle tricks. Hopefully this will continue to grow with Ulthuan's wisdom!
Collinisimo
wamphyri101
geoguswrek
Ptolemy
Xarhain
tethlis the slayer
krysith
Mithstar
Th3_5had0w_K1ng
Furion
All Battle Chronicler images have been made by Th3_5had0w_K1ng. Thanks!
Trick #1, 'The Classic' War Machine Hunting
I thought that we may as well start off with a classic trick that I am sure everyone is familiar with. And that is warmachine hunting. Through my experience, most of all of my opponents warmachine crew have been s3 and ws2. That means that when you charge that warmachine with your eagle on turn two, which is almost inevitable, your opponents will be hitting you on 5s, and wounding you on 5s. Therefor, they only have 1/3 chance of doing a single wound to you. You, however, will be hitting on 3s, and wounding on 3s as well, so you should be getting .89 wounds on your opponent. That means you will be winning combat mostly every time. 1 from the charge, and 1 for wounds. From my experience, warmachines have low leadership, and will usually break even when beaten by 2 points.
A tip I would like to point out to everyone, is that your opponent will like sticking more than one warmachine together, usually on a hill. This means that if in your first turn, you move your eagle up on his flank and within charging distance of one warmachine, you can usually charge the closest one, beat it and run it down, while at the same time overrunning into his second warmachine, successfully taking out 100-200 points with your single 50 point eagle. Also, if you get this kind of charge off in your second turn, then you only are giving your opponents warmachines 1-2 turns to shoot, depending on who goes first.
Trick #2, 'Wizard Assassination'
Here is another classic that most of you must already know as well. Don't worry old experienced players, we'll get into some more complex tricks later, but this is for those of you who are relatively new and still need to learn the old tricks. Anyways, what you do here usually takes 2 or more eagles, but the pay off is well worth it. What you do is you charge in an eagle to the front of an opponents unit that is holding their oh-so-powerful-mage. Then, you direct all of the eagles attacks at your opponents mage. Because mages are generally fragile and do not have much protection, you should be getting .89 wounds. You're eagle will then surely be killed afterward. However, in your next turn you do the same thing, charge in with a second eagle. With two onslaughts of this, you should be averaging 3 wounds on their mage, and this is usually enough to kill it. And trust me, 100 points is well worth the points for your opponents mage, and stopping their magic relatively early in the game.
Trick #3, 'The Run-Down'
Now here is where things get interesting. This is the one trick that my opponents question/hate the most (other than Trick #5..). Let me set the scene for you:
As you can see in this scenario, your two blocks of PG have just charged your opponents two enemy units. Your GE flies up to the right. You also notice the size and threat of the two enemy units that you just charged. You look at the larger enemy unit to the left. You realize that you have a good chance of tying/holding against that large unit with your PG, but you do not think you can beat it alone. You also look at your opponents smaller unit on the right. You think you can definitely beat that unit alone with your PG unit, but it may take two rounds of combat. Because you were smart and looked ahead, you moved your eagle to the right of the combats, and the reason why will become clear soon.
- 1PGCharges.jpg (24.68 KiB) Viewed 722 times
So the battle goes on. You turn out to be right, neither units go anywhere on your combat phase. Then it goes over to your opponents combat phase. Because you have numbers on the smaller enemy unit now, you break it and it flees. However, you decide not to chase after it with your PG unit. You instead reform looking to get a flank charge against your opponents larger unit, and you let the smaller unit get away, because you know that you need the help in the other combat.
So it is the beginning of you're turn now, and the scene looks like this:
So what do you do? You declare two charges. The first is your PG unit into the flank of the large enemy unit. The second, however, is your GE into their fleeing small enemy unit. You know that if that enemy unit rallies, you will have then gotten no points for it because of the new rules, so you chase it down with your eagle. You charge with your eagle and get the average of 19" charge range. Because they were only approximately 7" away from your eagle, there is close to no way they can flee far enough (and they have to flee, as they were already doing so) from your eagle, so once again that little 50 point model has made up for its points three fold or more, and allowed you to turn the tables on the other larger enemy unit.
- 2Empirebreaks.jpg (22.04 KiB) Viewed 722 times
Trick #3.2, 'Chasing Away', special thanks to Ptolemy
- 3EagleCatchesflee.jpg (23.31 KiB) Viewed 722 times
Here is another similar thing you can do, that helps you clear those smaller units on the board and gain you a few extra points in the game. When you charge a unit, and you know that they are going to flee, then you can charge them once again with an eagle. That way, they are forced to flee once again, either to be caught by your eagle, or run off the board. If neither of those things happen, then it is well worth moving that unit another 2d6" away from the action. Remember, your eagle only has to be within 22" of that unit to be able to declare the charge.
Trick #4, 'The Speed Bump'
This is a simple trick, but I find that it works rather well in slowing your opponents down to give you more time to shoot/magic their big combat units to give you a combat edge when they get to you. Pretty much all you are doing is flying your eagle up to their big units, then angling the eagle so that if the eagle is charged next turn, the big combat unit will overrun in a direction they do not want to go, or they can not charge and reform to get out of the way of your eagle, which you will then just move back and do it again, or they can charge, kill your eagle, and then not overrun, and move a total of one inch in their turn, instead of their typical 8-10" advancement on your line.
Trick #4.2, 'The Double Block', special thanks to geoguswrek!
This is very similar to 'The Speed Bump', however you would use it when it is not guaranteed that you're eagle would hold, ie. your opponent causes Terror. In this trick, you put two eagles blocking your opponents unit, and when he declares a charge against the first, you flee, but then he can only redirect into your other eagle. You flee a second time with the other eagle, and because each unit can only redirect one time in each turn (see page 18), your opponent is then forced to go after the second eagle. If you set it up right, this can lead your opponent into a bad position, sometimes setting you up for a flank charge.
Trick #4.2.1, 'The Double Block'
In this variation of the double block, instead of fleeing with both eagles, sometimes it can be advantagious to hold with the first eagle. Then, when your opponent overruns, he will hit the second eagle, and be stuck there for he cannot fight in combat that turn. However, be watch out for your opponent using Trick #5 on your to try and get through the second eagle as well.
Trick #5, 'The Place Holder'
This may just be my favorite trick of all to use in a game, because it catches your opponent off guard, and can help you get out of very tricky situations. Some of you may already know this trick from reading my past BatReps, and if so, kudos to you for reading my BatReps! Anyways, here is a situation where this trick could be applied:
As you can see, your opponent has put a weak unit right in front of your PG unit, in hopes that you will charge it, beat it, and run it down. If you did this, then you would run into his second smaller unit. However, in doing so, you will have fallen into his trap, as he will then be able to flank you with his larger, more formidable unit. So what do you do? You declare two charges. Your eagle is conveniently placed on your right flank, so you charge the small unit right in front of your PG with your PG, then you charge the small unit behind that with the eagle. In doing so, you then proceed to beat that unit and chase it down with your PG, running into the small unit behind it. However, because you flanked that unit with your Eagle, you can then fight another round of combat in the same combat! You then can beat and run down that second unit with your PG, and in doing so get out of harms way from the flank charge.Code: Select all
---------------------------------------------------------------------
---------------------------------------------------------------------
---------------------------------[EEEEEEEEEEE]------------------------
----------------------[EEEEEEE]---[EEEEEEEEEEE]------------------------
---------------------[EEEEEEE]--------------------------[GGG]--------
--------------------[EEEEEEE]--------------------------[GGG]--------
-------------------[EEEEEEE]-----------------------------------------
------------------[EEEEEEE]-------[EEEEEEEEEEE]------------------------
---------------------------------[EEEEEEEEEEE]-----------------------
--------------------------------------------------------------------
------------------------------[PPPPPPPPPPPPPPPPPP]--------------------
------------------------------[PPPPPPPPPPPPPPPPPP]--------------------
------------------------------[PPPPPPPPPPPPPPPPPP]--------------------
---------------------------------------------------------------------
---------------------------------------------------------------------
---------------------------------------------------------------------
Trick #6, 'Placement Stalling', special thanks to wamphyri101!
I believe that the placement of units at the beginning of the game is the one largest thing that will make or break the result of any game. Great Eagles, believe it or not, can give you quite the edge with this, and here is how. The very first thing you place down at the beginning of the game is your eagles. The more eagles you have, the more units your opponent will have to place down for you to see before you start putting down actual units. This way, you can 'pick your fights', so to speak, and place your units the way you want them in relation to your opponents units. I typically try to put my GEs on the flanks to begin with, because with their 20" movement they can get were they are needed relatively easily.
Trick #7, 'Combat Res Generator', special thanks to Xarhain!
Trick #7.2, 'Reform Prevention', special thanks to tethlis the slayer!Xarhain wrote:One more basic tactic is the combat res generator. Often you'll have flown behind enemy lines to attack a war machine or attempt any number of the tricks listed above, but for some reason the eagle is no longer required. Maybe the cannon blew itself up or the unit you were stalling got purple sunned. Either way, you now have a free eagle you can charge into the back of a stalling combat. With the new lack of unit strength you get +1CR for charging and +2CR for the rear charge. You'll do a wound against standard infantry and maybe take one back. Instant +3CR, and a speedy unit involved in the combat to chase them down once they break!
Not only does charging an eagle into an already existing combat grant you extra combat resolution, but it can also give you much more in certain situations! Now that in 8th Ed, you can take a combat reform even if you lost the combat. Luckily for us, there is a quick and easy way to get around this, and keep your flank bonus. So say you have a flank an a relatively large unit, and you don't think you are going to win by much this next turn, so you want to keep that flank. All you need to do, is charge an eagle into a different flank. That way, because the opponent is engaged in more than one frontage, they cannot take a combat reform!
Trick #8, 'Helping Avoid Standing and Shooting', special thanks to krysith!
So we all know that Great Eagles can take down a small unit of skirmishing archers/skinks in combat. Or even holding up a large unit of archers/crossbowmen for a turn or two so they can't shoot for a bit. The only problem is getting them in combat. There are a couple of ways to do this. First, there is the simple flank charge, or charging from within 10", but sometimes this just isn't good enough, because we don't have enough time to set that up, or you are attempting to charge a skirmishing unit. So how can we charge in without getting shot to pieces from Stand and Shoot?
As krysith pointed out, one way to do this is charge the unit with the eagle from behind one of you're own units. Because of the tall nature of the Great Eagle models, they can typically see over our own infantry units. Therefor, they can charge over units because they can see over them, due to true line of sight. The benefits that come from this, is it becomes much more difficult to shoot at something when it gets a cover bonus. So, if you charge at a unit from behind one of you're own units, they will get a -1 penalty for standing and shooting, -1 for long range (usually), and -2 from hard cover. That adds up to a whopping -4 to shoot at them. This is a 7+ for elven archers, and 8+ for everything bs3, making the likelihood of you're eagle dying much less.
Trick #9, 'Mobile Impassable Terrain', special thanks to Mithstar!
I would however like to point out that this tactic has one flaw. If your opponent has anything that can charge into the combat between your GE and his unit, that can shorten the time where you can cause a road block, so make sure when setting this up your opponent has no way of charging your eagle so that he can just blow through it and continue on his merry way. Remember, the point of Eagles is to be as annoying as possible.Mithstar wrote:Mobile “Impassable Terrain”: Because magic and war machine shooting has become so dangerous, more and more players are using scouts and skirmishers to try and neutralise the threat. Most scouts and skirmishers operate between the two armies. This creates quite a unique opportunity. If a group of scouts or skirmishers are in front of an important enemy close combat unit (basically any unit you can’t yet combat) or a unit containing the bsb, general, etc, charge it with a GE. Your GE should take no more than 1 wound (using cover) charging in. Combat should be close (±1 point difference, very important) and both units are stuck in combat. However, now you have a combat that can continue for ± 2 turns, slowing down the enemy unit behind it considerably. In the hands of a capable general this tactic (even though it's situational) can be used to outmanoeuvre the enemy to great effect.
This tactic has a very nice synergy with the Lore of Life.
Trick #10, 'Basic Redirection', special thanks to Th3_5had0w_K1ng!
The following is taken from the "Redirecting?" thread.
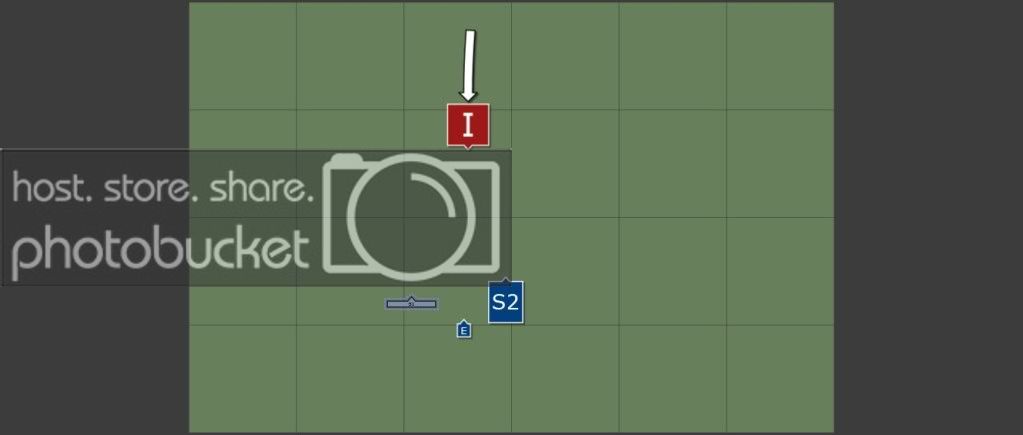
Trick #11, 'Safe Long Charges', special thanks to FurionTh3_5had0w_K1ng wrote:I made a quick scenario in Battle Chronicler on a basic redirecting. I was an eagle hater until I learned how to use them. They really are invaluable and allow the Elves to control the flow of battle. Sorry this post seems long but it's worth reading if you want to learn how to use the eagles (plus it's mostly pictures!).
9 Irongut Ogre Deathstar VS 7 SM, 30 Spears, Eagle
Ogre Turn- move up cautiously to give the high elves a 10 inch charge on their turn.
High Elf Turn - Freedom to move units closer without the danger of being charged by the Ironguts. Move eagle at an angle to where the ogres can't overrun into either unit.
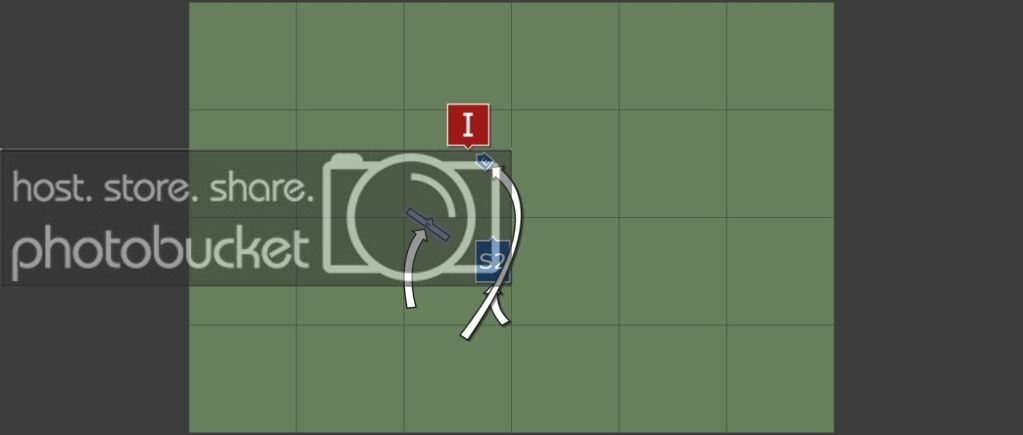
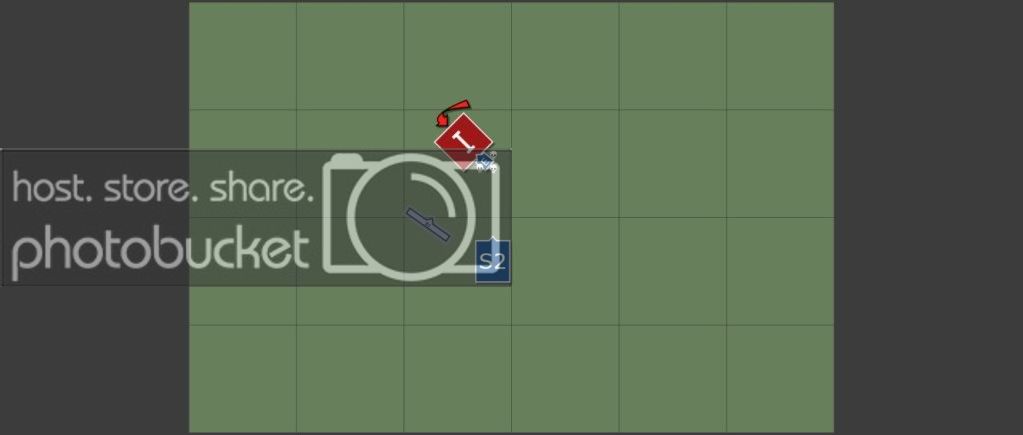
Ogre Turn - Lets say he decides to charge the eagle. Excellent.
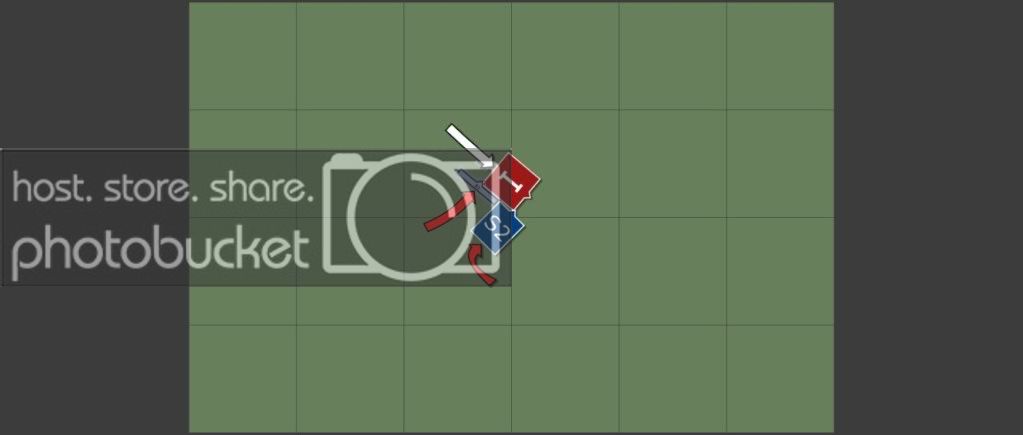
High Elves - Lets say due to either inexperience or Frenzy he overruns the dead eagle an average 7 inches. This gives us 2 charges on the flank and allows us to benefit from ranks of spears and killing power of swordmaster MSU.
There are more aspects to redirecting but this is the basic premise. Hope this helps!
Overview:Furion wrote:Guess I can share with you one of the protips
Safe long range charges
Description: your White Lions are 15-17" away from enemy units. While charging at them would be glorious, your enemy has longer range than you. If you happened to fail, you would get charged by both of his units and then lose. What to do then? You have to plan one turn ahead. Position your eagle close to your unit, as per picture. In the following turn, declare a charge with your White Lions on enemy unit, make your opponent react and after all charges have been declared, roll for it. Now there are two options:
a) you rolled high and you are in! With a successful charge you can enter 1" within your unit and you go through.
b) you rolled not enough and you fail charge. With fail charge your unit can't enter <1" from other unit / impassable terrain. Therefore, your unit moves only a little bit (marked with a green line) With careful placement, it is possible that your unit won't even move at all!
That's it. Tell me if you like this short tactica
cheers
Furion
I guess what I'm really trying to tell everybody is this: think ahead! If you can think ahead a couple of turns, you can set up these neat tricks, and avoid tricks that your opponent tries to set up against you. A lot of this comes from me being an avid chess player, because in chess it is all about thinking ahead. I use the same skills in warhammer, and so far I am doing pretty well.
Commentary is welcome and appreciated.
