On the very day 9th Age Beta rules were released I had a great pleasure to play against Eltharis. We haven't met before but he was very helpful during my game against Marchosias and his Dark Elves. Eltharis wanted to test 9th Age rules as well and I was looking for an opponent. Luckily I had some free time so we set up a game. We still used the Alpha version of the rules but we agreed upon using new deployment rules and secondary objectives that were explained in respective sneak peak. I will explain all the details later because I assume that not all the readers may be familiar with these rules yet. It will also serve as a context for some explanation why certain decision where made.
Eltharis wanted to test his Elves of Light army that was led by the Archmage on Ancient Dragon! (please, note this army was still using 8th edition High Elves army book for points values for all entries)
Elves of Light - Army List
Archmage; level 4; Star Dragon; Other Trickster Shard, Ring of Fury - 650 - Lore of Life
Noble; BsB; Heavy Armour, Fire Pike, Charmed Shield, Golden Crown - 124
21 Archers; Musician - 220
21 Archers; Musician - 220
5 Reavers - 80
5 Reavers - 80
22 Phoenix Guards; Full Command; Razor Standard - 405
23 White Lions; Full Command; Banner of the World Dragon - 379
3 Repeater Bolt Thrower - 240
I have faced a similar version of this army but never with an Archmage on Star Dragon. It is a very interesting combination because under 9th Age rules this model has a combined profile meaning you have a single model with 8 wounds, T7 and 3+ armor save. What is more this model is 4 level Life mage that will recover a wound each time it casts a spell.
The rest of the army is no less dangerous. Both combat infantry units are very well protected against magic and shooting. The support in the form of two units of archers and three bolt throwers means my units will have hard time maneuvering and will definitely suffer casualties. It also creates a very good situation for my opponent. If I go after his shooters, then his combat troops and the dragon will waste no time in getting to my troops. If I ignore the shooters they will shoot my fragile units and they might not be in good shape to attack his tough regiments.
For the reference, this is the army I took for this battle:
Outcasts - Army List
Larry the Loremaster, Earthing Rod, Armor of Fortune, Obsidian Amulet - 320
Bob the Battle Standard Bearer, Griffon (Swiftsense), Dragon Armor, Lance, Talisman of Preservation, Charmed Shield – 331
15 Sea Guard, Full Command - 210
15 Archers, Full Command - 180
5 Ellyrian Reavers, Musician, Bows, Spears - 105
5 Ellyrian Reavers, Musician, Bows, Spears – 105
5 Dragon Princes, Musician, Banner of Eternal Flame - 175
5 Dragon Princes, Musician - 155
10 Swordmasters, Bladelord, Musician - 150
10 Swordmasters, Bladelord, Musician - 150
10 Lions, Banner, Musician – 145
Eagle Claw Bolt Thrower - 80
Eagle Claw Bolt Thrower - 80
Great Eagle - 50
Great Eagle - 50
8 Sisters – 112
As we also used new deployment rules let me discuss the terrain and the way we positioned our respective armies first and then I will discuss the plan I had for this battle.
Terrain
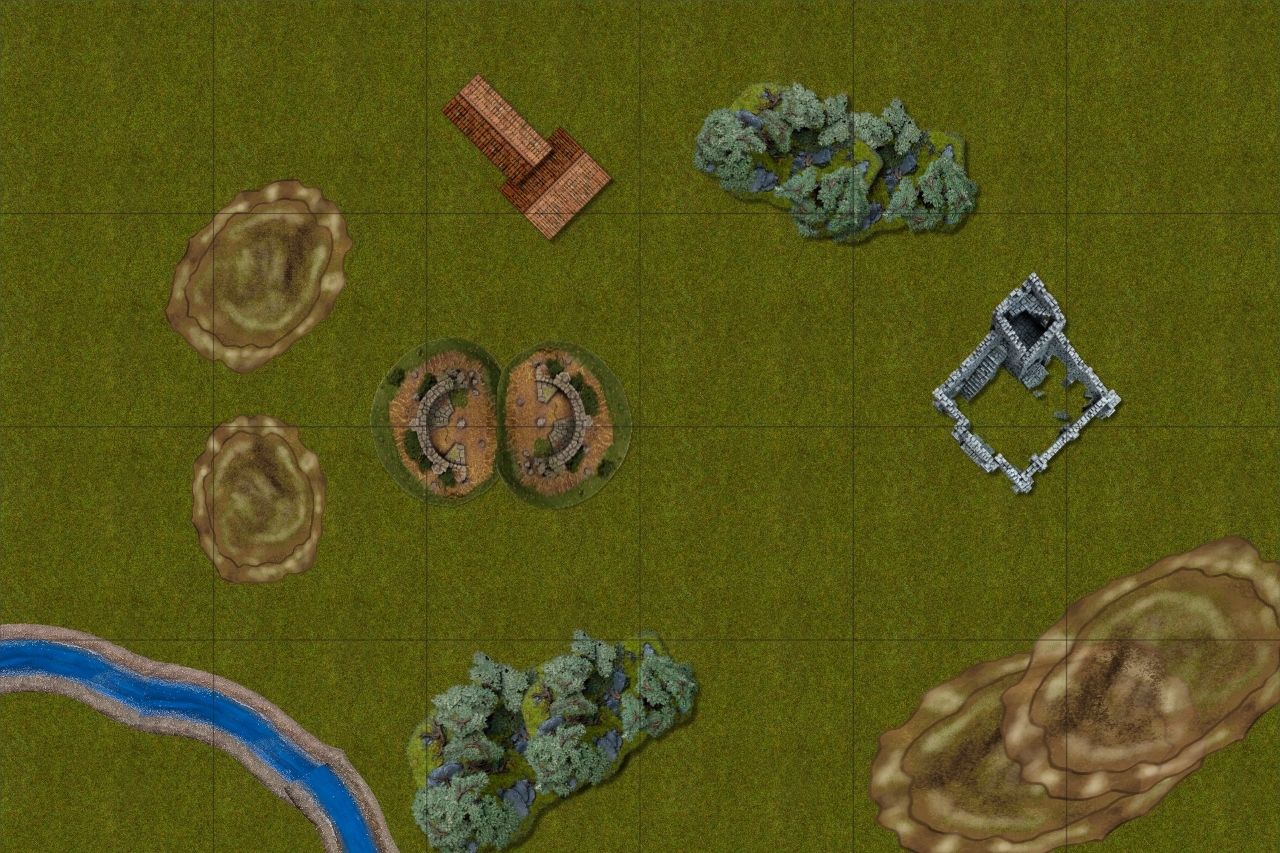
Hills - block LoS, elevated position meaning it is possible to shoot over regiments
Ruins - provide hard cover, dangerous terrain for all but skirmishers, cavalry, monstrous cavalry and chariots fail Dt on 1 and 2.
Forests - as usual
Buildings - provide hard cover, up to 15 models can shoot
River - no steadfast
The ruined fort on the right was treated as ruins. The terrain more to the left and close to the hills was treated as dangerous terrain but not blocking line of sight at all.
Deployment
First of all we decided to roll for deployment as per new rules and got Flank Attack (you can get either classical (1-3), diagonal (4-5) or flank attack variants (6)). It means that the deployment zones looked like this:
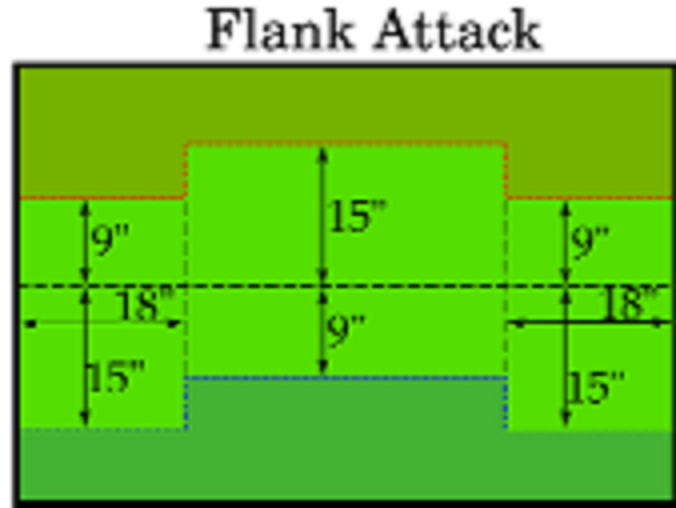
Then players roll dice and the winner has to decide if he wants to be an attacker or defender and picks the site. The attacker has to choose the deployment zone with the center 9" away from the middle of the battle field. The defender has to pick the one which is 15" from the center.
I chose to be the defender. I thought it would give me a better option to be in outflanking position. Also, if Eltharis positioned his Bolt Throwers in the flanks they would be further away from my units. If in the center then my outflanking regiments would have shorter way to get them. I also picked South as I think North was worse for my opponent to deploy his shooters while I had some cover to advance against him.
We also rolled for the secondary objective and we got Breakthrough. The rules for this scenario are:
where scoring unit is defined as:A player with one or more Scoring units in his opponent's deployment zone at the end of the game gains an extra 10% of the game’s size in VPs. Ambushers which entered the battlefield on game turn 4 or later don’t count for this purpose.
In that case, either White Lions or Phoenix Guard could be scoring units for Eltharis. While for me these were: Archers, Sea Guard, White Lions, Dragon Princes.All units with a Standard Bearer (including Battle Standard Bearer) are Scoring Units, unless the unit (or any model in the unit) has the Light Troops special rule. Units consisting solely of characters can never be Scoring.
Due to the nature of our respective armies I decided I have better chance to block his infantry from entering my deployment zone first, even if I initially wanted him to move forward through the center.
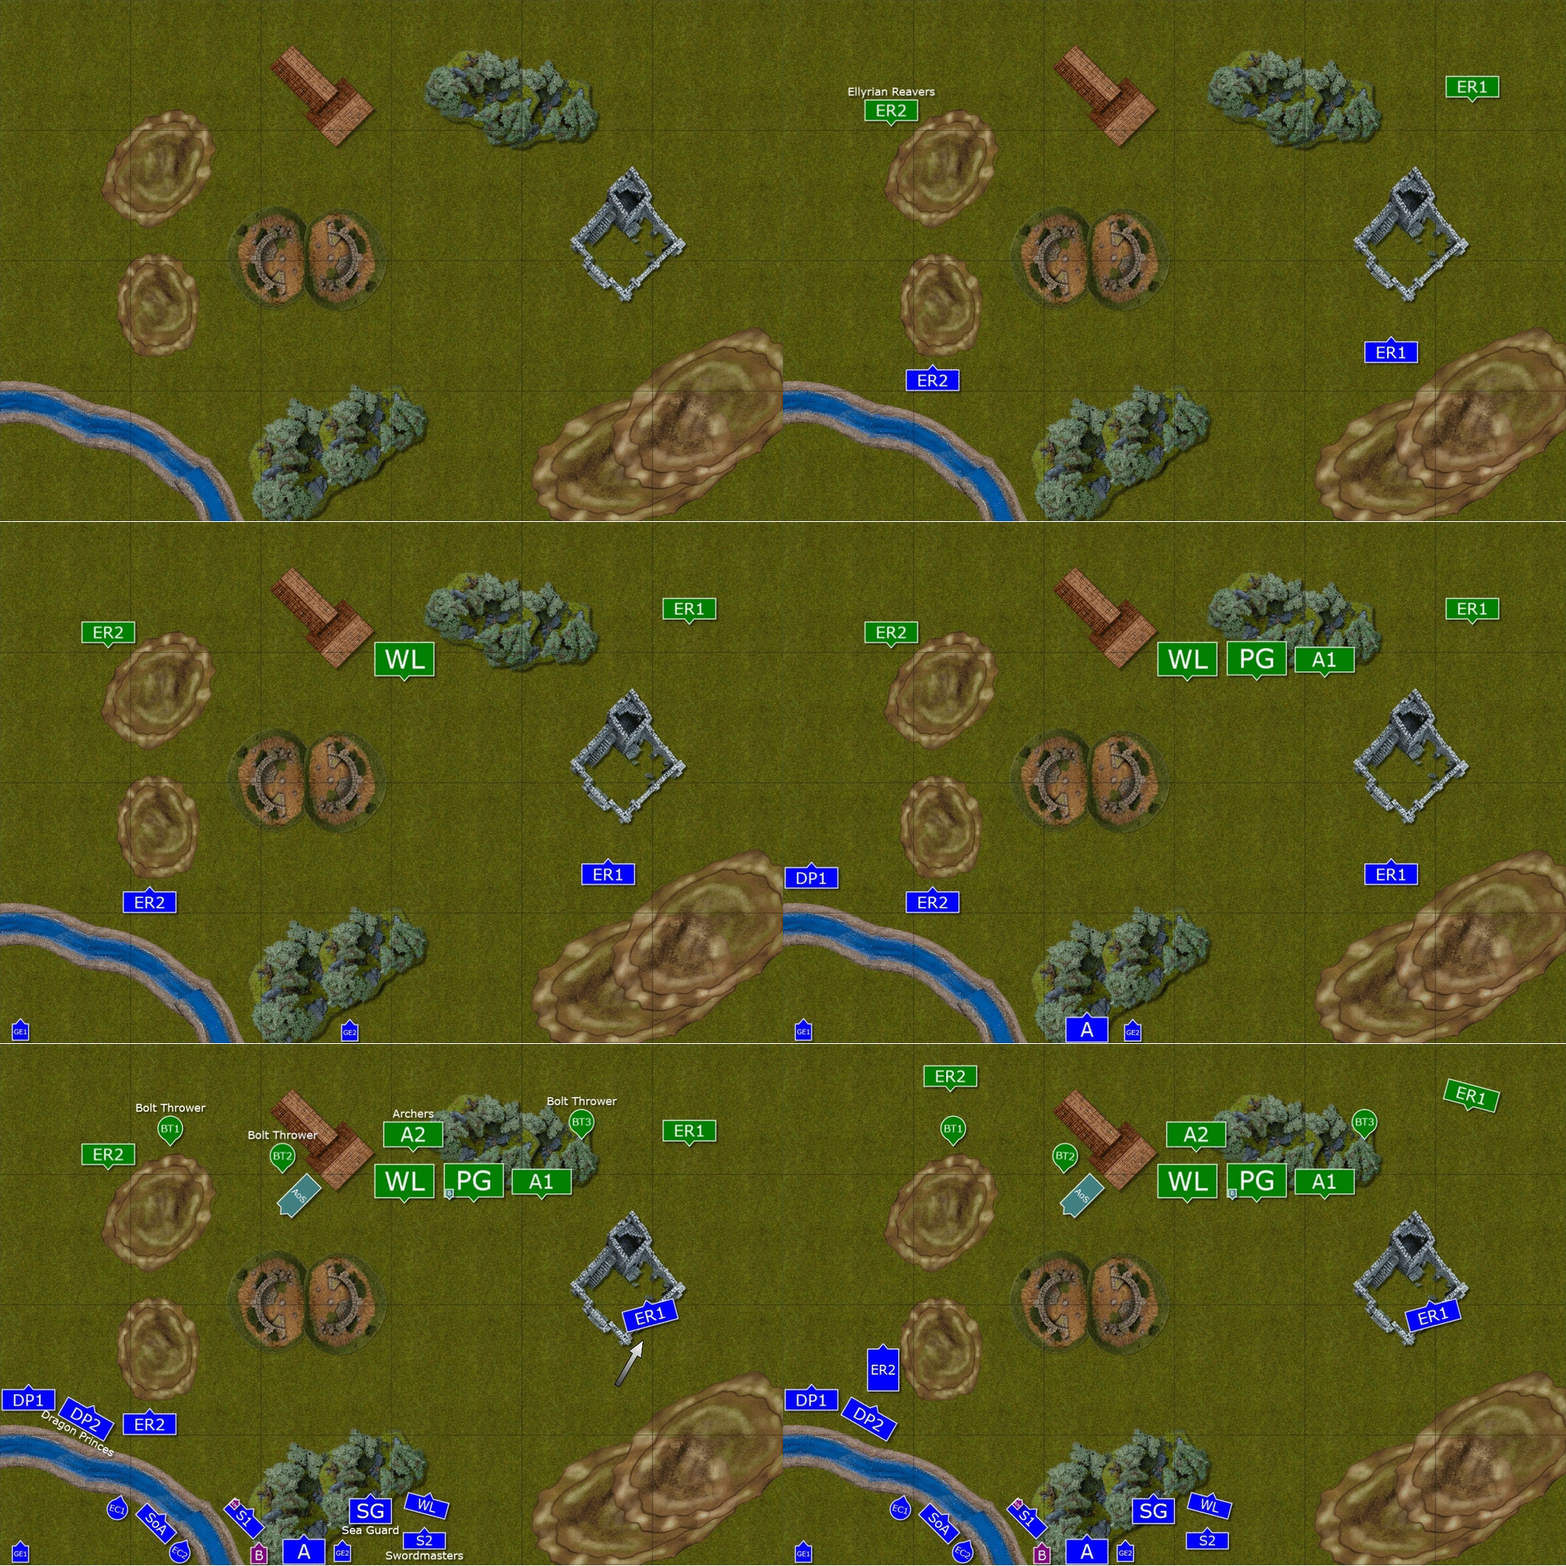
Deployment order and vanguards
Deployment order:
1. Ellyrian Reavers (ER1) - Ellyrian Reavers (ER1)
2. Ellyrian Reavers (ER2) - Ellyrian Reavers (ER2)
3. Great Eagle (GE1) - White Lions
4. Great Eagle (GE2) - Phoenix Guard
5. Dragon Princes (DP1) - Archers (A1)
6. Archers - Rest of the Army
7. Rest of the Army
Vanguard:
1. Ellyrian Reavers (ER1) - Ellyrian Reavers (ER2)
2. Ellyrian Reavers (ER2) - Ellyrian Reavers (ER1)

Final deployment after vanguards
There is an interesting novelty in the deployment procedure now. At any moment a player can decide to deploy one or more drops. Then, you have to count how many deployment drops the second player to finish has left. The number of these is added to the roll off for the first turn. It means that Eltharis had the first turn automatically as I had many units to deploy after him.
I would like to apologize here as I thought it works differently and believed that last drop still counts as one unit thus conferring only +1 bonus. However, that would make no sense and I simply misunderstood previous explanation I have received from the 9th Age Rules-team. Fortunately, Eltharis rolled better anyway and got first turn as he should.
It is interesting approach as it allows to predict who is going to be first or who has better chances for it and one can deploy accordingly. However, I could have deployed my remaining troops in one go too, even before my opponent finished and technically get the chance to get the first turn too. It may also lead to the situation where your opponent assumes he will be first due to fewer deployment drops but can be tricked when you deploy all your army before him.
Eltharis rolled for the spells for his Archmage and got the following:
Earth Blood - Casting Value 5+/9+, Caster’s unit/Range 12” Augment, Lasts one turn, Target has Regeneration (5+).
Master of Stone - Casting Value 7+/12+, Range 18” Hex, Direct Damage, Instant, Range for this spell can be measured from the caster or from any Impassable Terrain or Hill on the table. Target suffers 1D6/2D6 Strength 4 hits.
Flesh to Stone - Casting Value 12+, Range 24”, Augment, Lasts one turn, Target has +2 Toughness.
Regrowth - Casting Value 13+/18+, Range 24”/Range 48”, Augment, Remains in Play, Raise D3+1 wounds in target unit at the end of each of caster’s magic phases. Units of Height 2 or more halve the number of Raised wounds (rounding fractions up).
Elves of Light - Turn 1
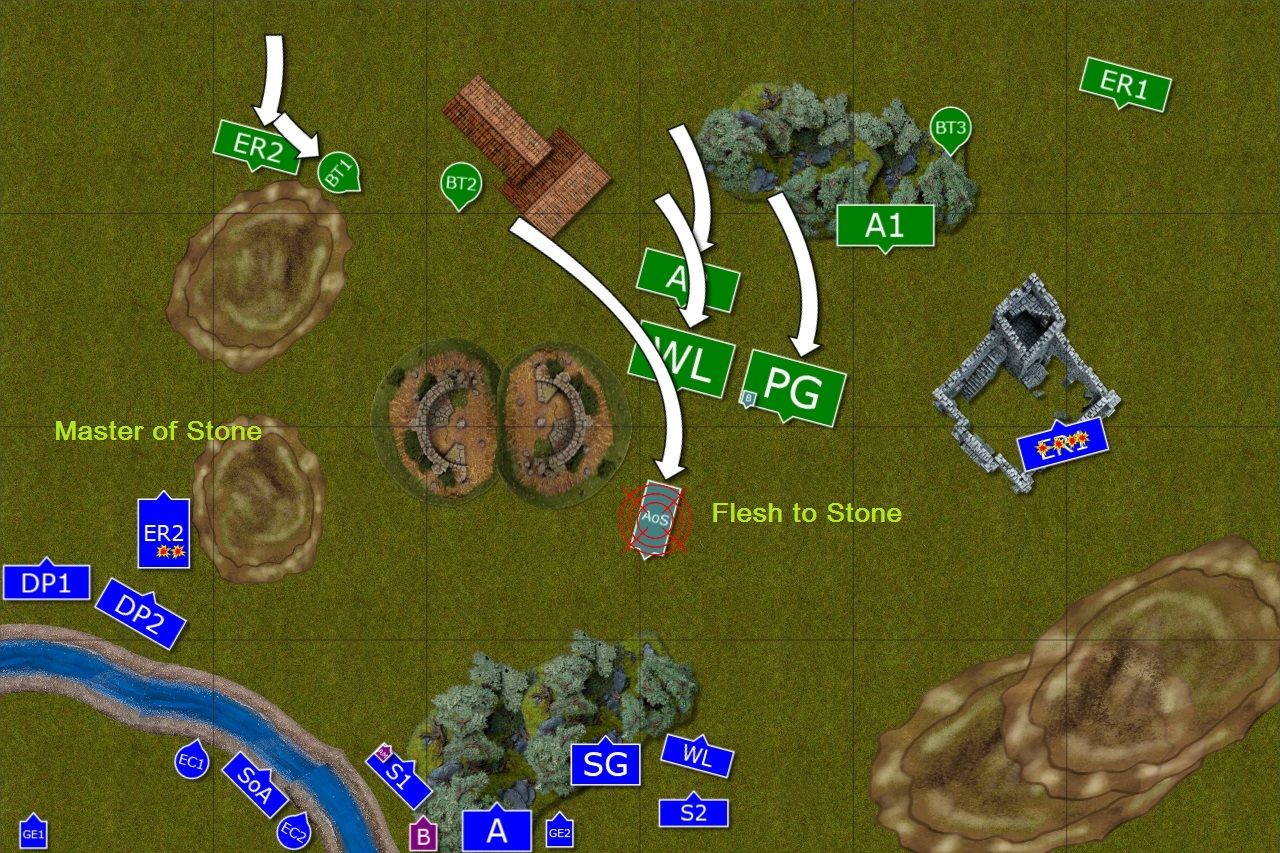
Advancing through the center
The Archmage spearheaded the advance boldly, taking a risk that all possible shots will be directed at him. He summoned raging storm of magic and first invoke avalanche of stones on enemy fast cavalry and then toughened the skin of his powerful mount even further. The shooters didn't have that many good targets yet but another fast cavalry was almost decimated despite the cover of the ruins.
Magic Phase Details:
Winds of Magic: 6,6 --> 12:7 (one channel for the Master of the Paths)
Ring of Fury at Great Eagle (GE 2): 2,3,3 = 8, dispelled on the roll of 3,3 + 2 = 8
Master of Stone at Reavers (ER 2): 4,6,6 --> Overwhelming power --> 16 + 4 (power level) + 2 (d3) + 3 (PDU) = 25 --> no dispel attempt --> 2 casualties --> Miscast: 1,3 --> S5 hit --> no wounds --> 3 power dice lost
Flesh to Stone: 2,6,6 --> Overwhelming power --> 14 + 4 (power level) + 2 (d3) + 3 (PDU) = 23 --> dispel attempt failed on the roll of 1,1,4,4,5 + 2 = 17 --> Miscast: 2,3 --> S5 hit --> no wounds
Outcasts - Turn 1
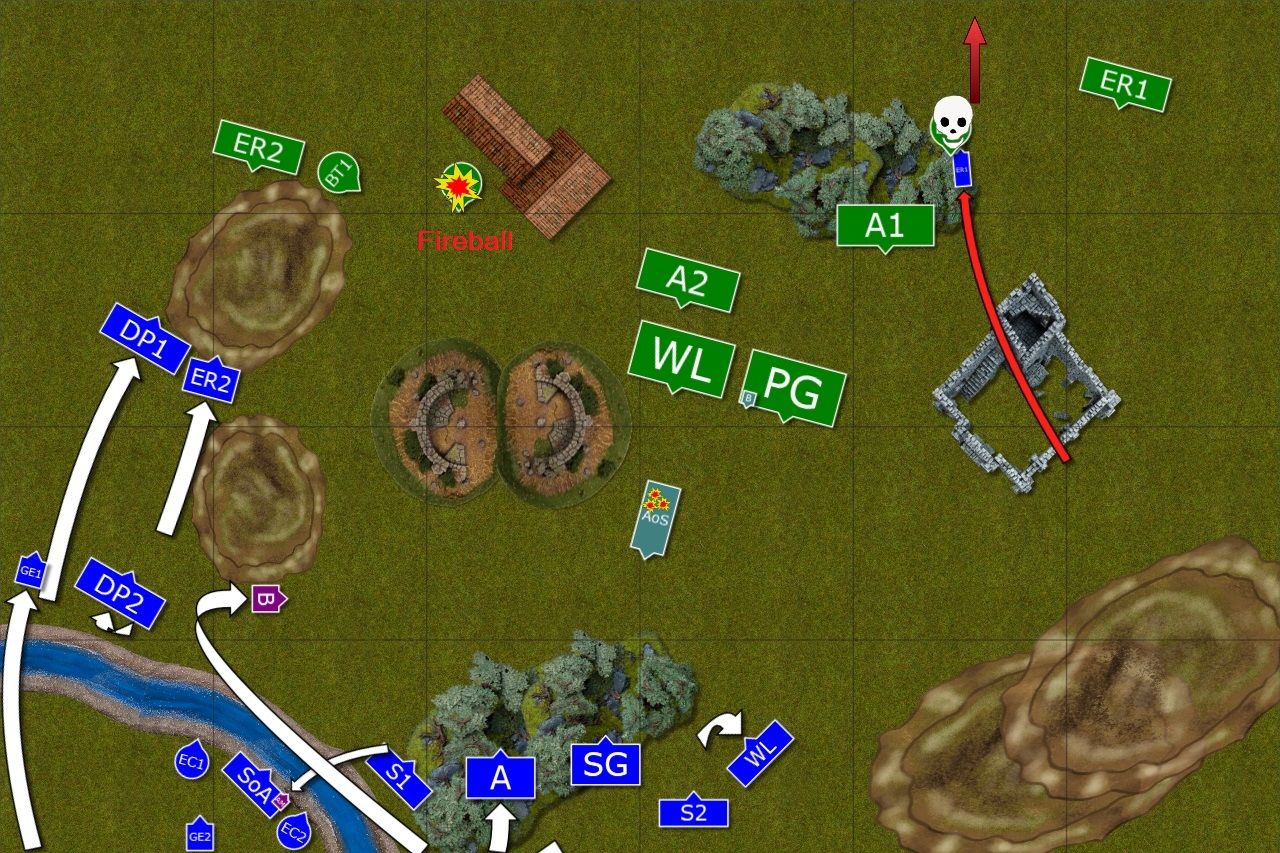
Reform before the Dragon strikes
Outcasts had to react fast. Lone Reaver threw caution to the wind and stormed through the ruins. He hit the enemy crew and managed to break them and run them down all on his own! The cavalry on the other flank maneuvered to overwhelm their foes there and get rid of another two war machines. But thanks to Larry one of them was already burned to the ground.
The shooters then aimed at the dragon and inflicted total of 3 wounds on the beast despite its insanely tough skin.
Magic Phase Details:
Winds of Magic: 2,5 --> 7:5
2d6 Fireball at BT 2: 1,2,5 + 2 = 10, no dispel attempt --> 2d6 = 8 hits --> 2 wounds
Boosted Searing Doom at the Dragon: 3,3,4,6 + 2 = 18, dispelled on 2,3,6,6,6 + 4
Elves of Light - Turn 2
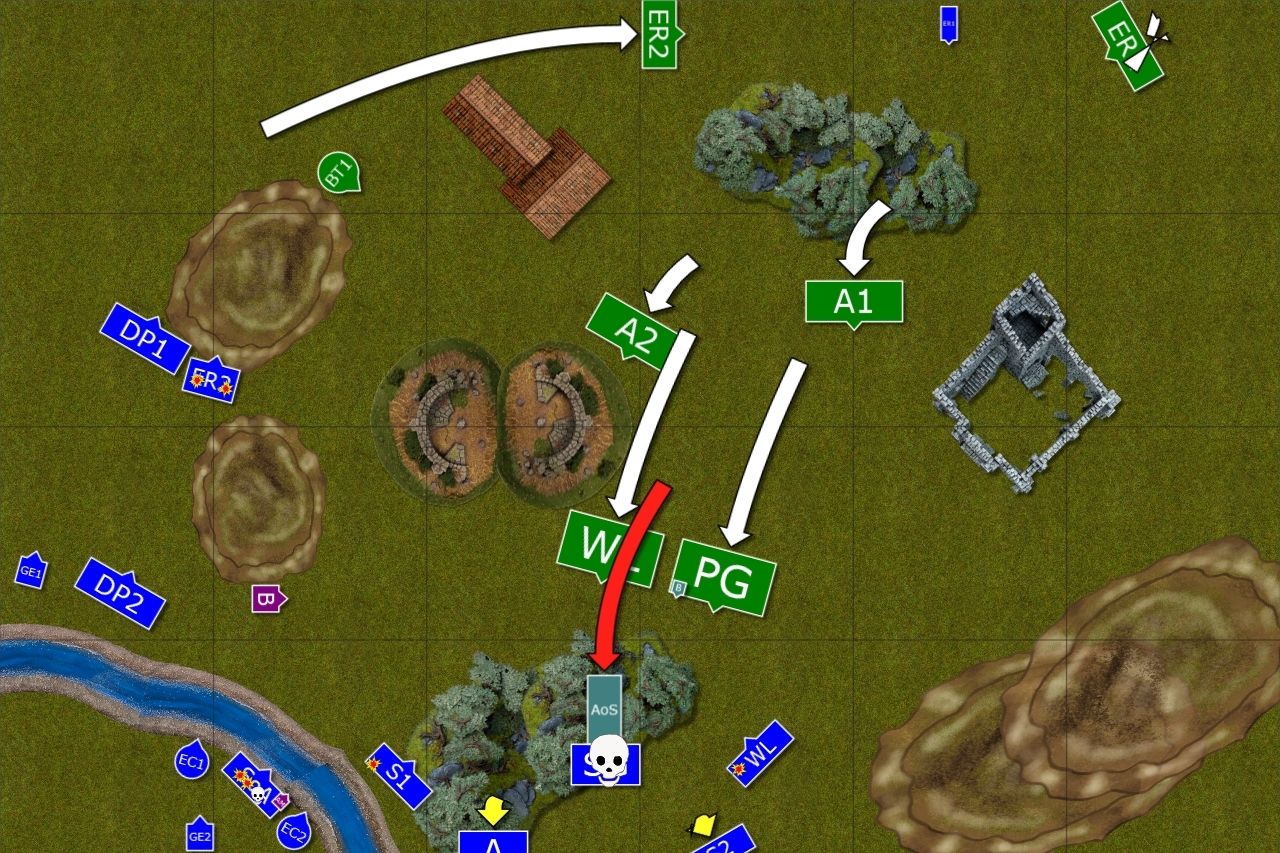
Dragon begins its rampage!
The Archmage spotted a weak link in the enemy formation and spurred his mount to attack. Star Dragon charged with a might roar and Sea Guard, unable to properly close formation in the forest, could not hold against such a ferocious attack. What is more, nearby Sowrdmasters and Archers fled despite encouragements shouted from the Battle Standard Bearer.
(Edit: That was a massive mistake on my part. First I should have pulled back Sea Guard from the forest where I had no steadfast. I challenged but in this situation I should probably just use all the attacks for lucky 6's to wound. Then I promptly failed break test, panic test for Swordmasters (on Ld8) and panic test for Archers (Ld9 with a re-roll). I could have avoided that if I positioned units just a little bit better. Instead, I lost 3 regiments.)
Magic Phase Details:
Winds of Magic: 1,2 --> 3:2
Earthblood on himself: 2,2,3 + 4 = 11, dispel attempt failed 1,5 + 2 = 7
Outcasts - Turn 2
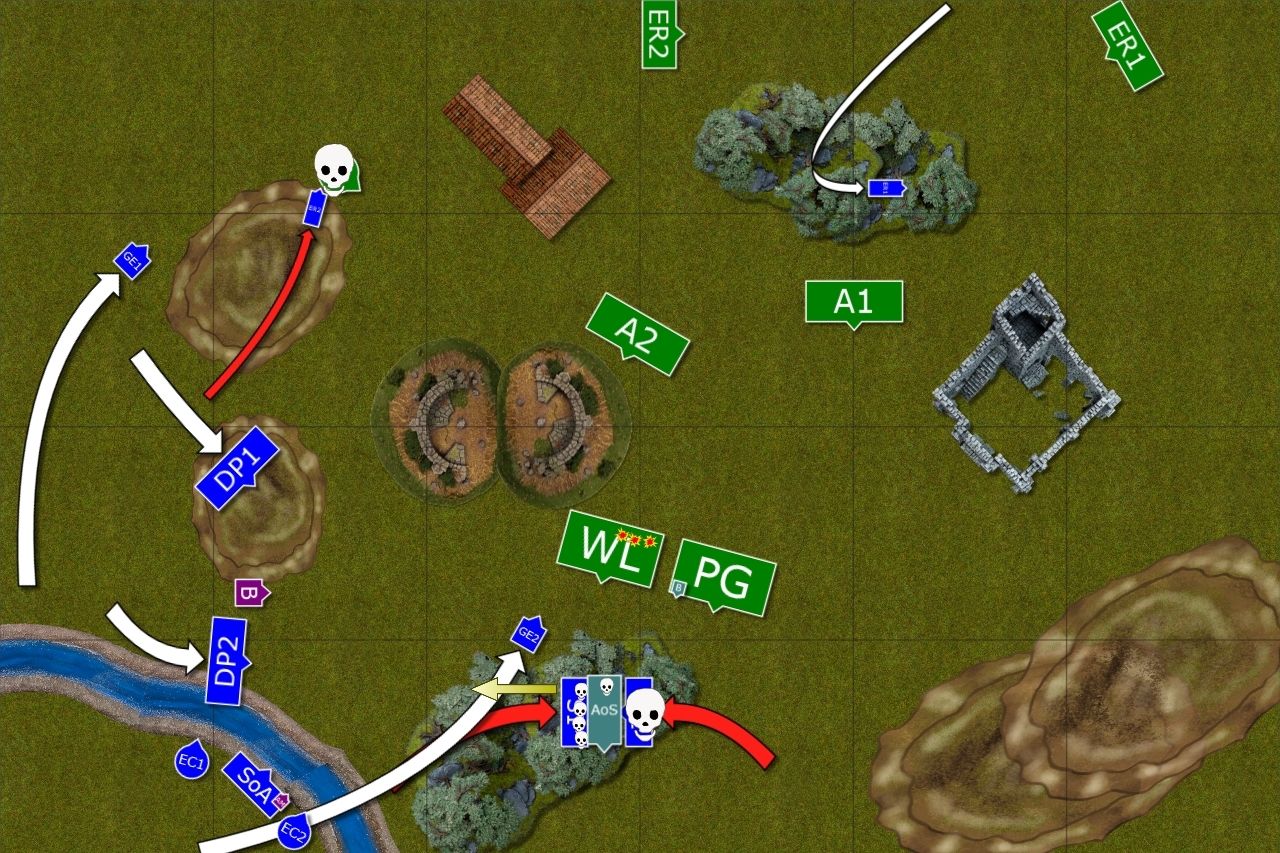
Foolish counter charge
Swordmasters and Lions both charged the Star Dragon, foolishly hoping to wound it badly. Instead, Lions got incinerated and killed to the last member while Swordmasters where thunder stomped and fled. They managed to flee the wrath for a while but the Dragon was about to emerge from the woods any second and there were other juicy targets for it to attack!
The only highlight was that another lone Reaver repeated the fit of his companion and destroyed the last enemy war machine. But it was clear now that the Outcasts suffered a very heavy blow and would need to use all their skills to survive that battle.
Magic Phase Details:
Winds of Magic: 3,5 --> 8:6 (one channel for the Archmage)
Miasma at the Dragon (WS): 1,4 + 2 = 7, no dispel attempt --> d3 = 1, WS6
Iceshard at the Dragon: 1,3,4 + 2 = 10, dispelled on a roll of 2,4,6 + 4 = 16
Wildform at Swordmasters (S1): 1,3,4 + 2 = 10, dispelled on a roll of 4,4,4 + 4 = 16
Elves of Light - Turn 3
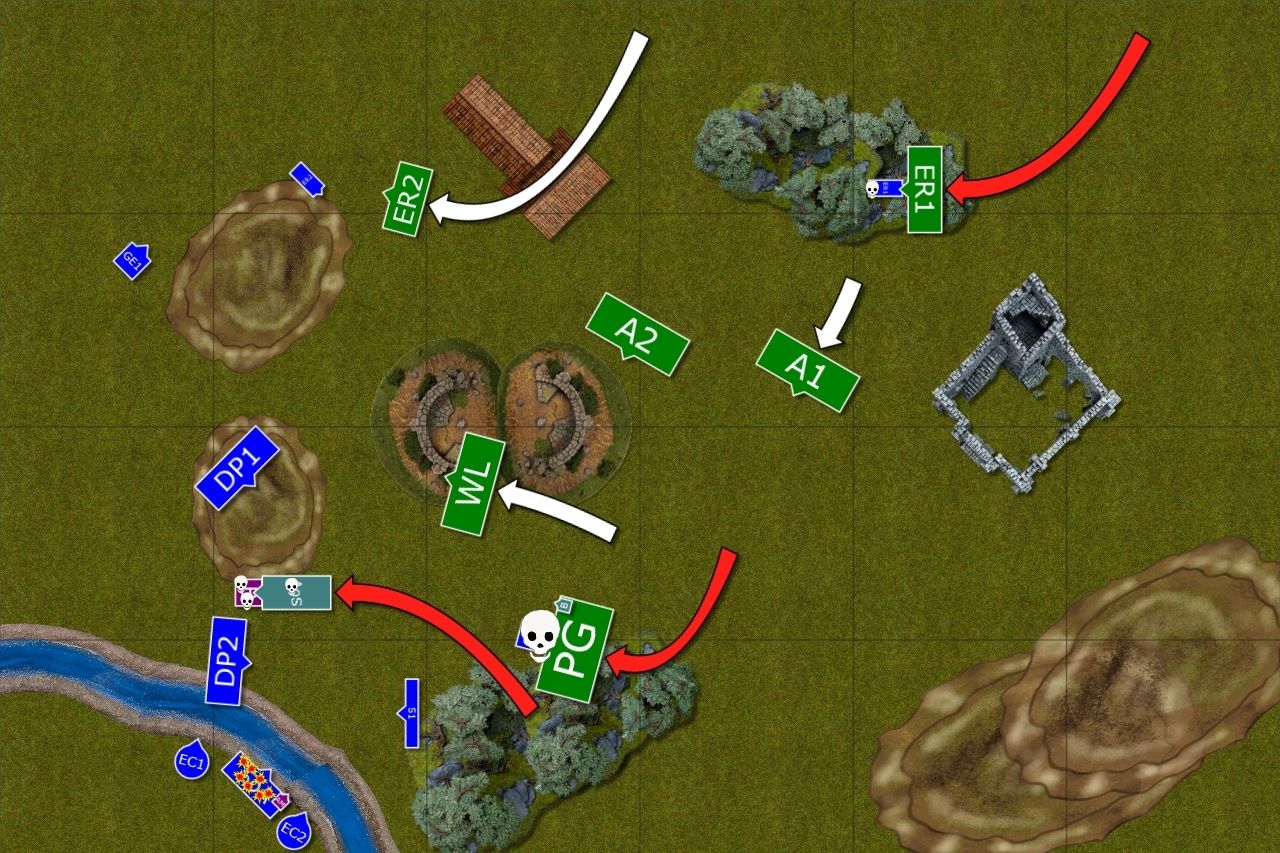
Star Dragon chooses another target
With so many enemy units routed the Archmage feels confident to attack one of the leaders of the opposing army and charges against griffon rider. Vicious aerial fight erupts where toughness of the Star Dragon is matched by viciousness and speed of the griffon. In the end the combat is not resolved with both monsters dripping blood.
The rest of the army press forward while the shooters finish off the Sisters accompanying the general of the Outcasts.
Magic Phase Details:
Winds of Magic: 4,6 --> 10:6
Master of Stone at Sisters: 5,6 + 2 = 13, no dispel attempt --> d6 = 4 --> 4 wounds, no successful save due to magic resistance.
Earthblood, Area: 1,2,4 + 4 = 11, failed to cast
Regrowth: 4,4,5 = 13, dispelled on the roll of 1,4,4,4,5 + 2 = 20
Flesh to Stone: 3,3 = 6, failed to cast
Outcasts - Turn 3
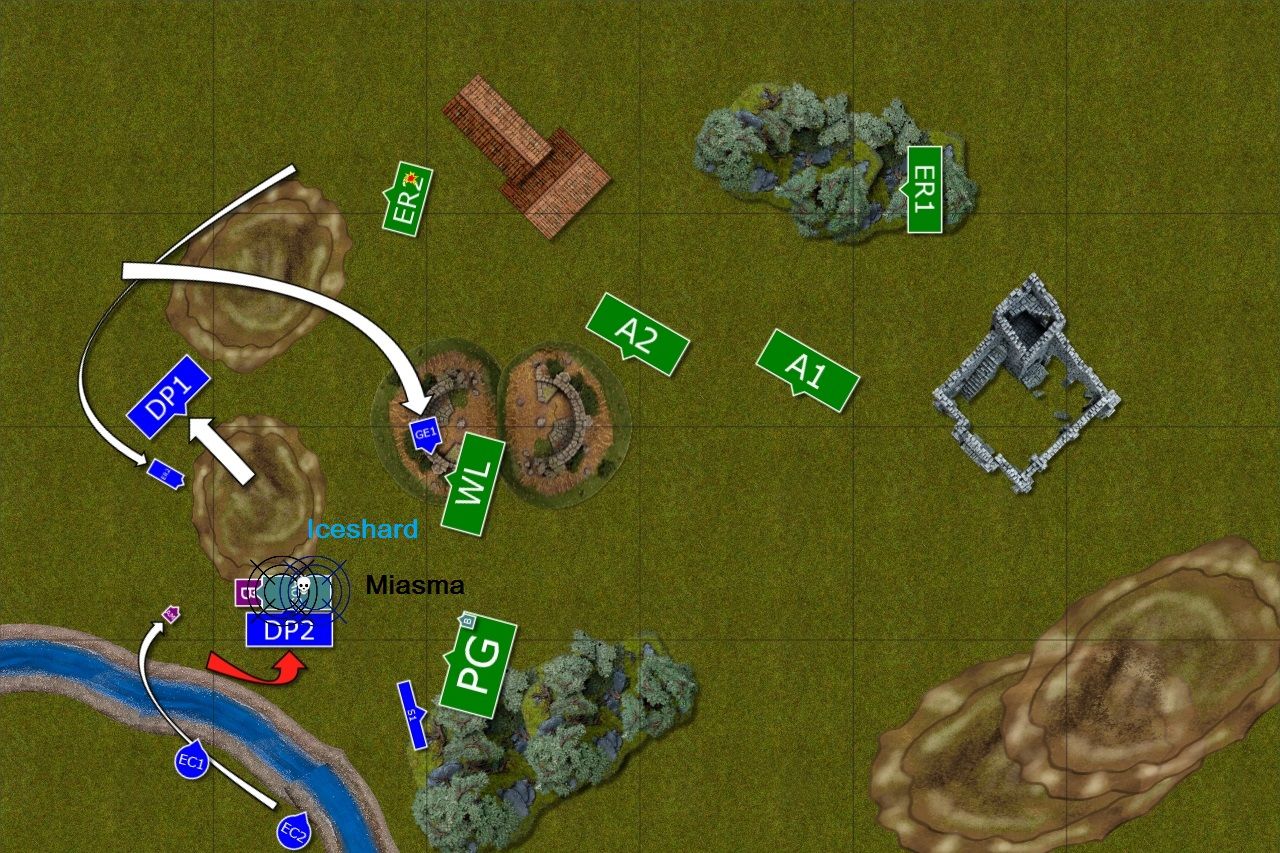
Dragon Trap!
Dragon Princes shouted their battle cry and attacked the Star Dragon. The beast was wounded but stubbornly held its ground. Outcasts were fighting desperate war now and some units had to buy time for the rest to hunt down the Dragon.
Magic Phase Details:
Winds of Magic: 2,6 --> 8:6
Miasma at the Dragon, WS: 3,6 + 2 = 11, no dispel attempt, d6 = 4, WS5
Wildform on Griffon: : 2,4,4 + 2 = 12, dispelled on the roll of 2,3,3,5 + 4 = 17
Iceshard at the Dragon: 2,4,6 + 2 = 14, failed dispel attempt on the roll of 4,5 + 4 = 13
Elves of Light - Turn 4
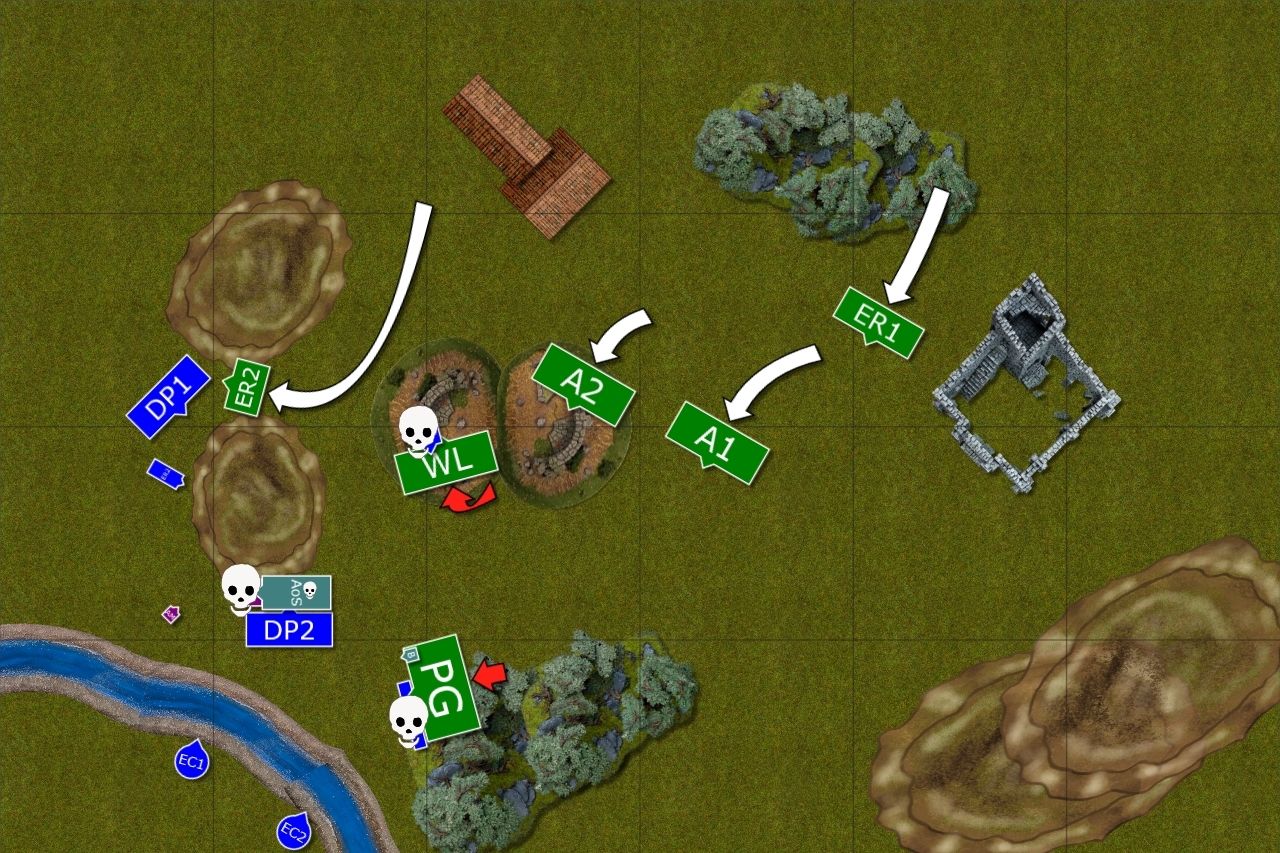
Battle Standard Bearer dies!
The remaining road blockers are removed and it is now just a matter of time before the survivors of the Outcasts army are cornered and surrounded. What is more, they also lose their valiant battle standard bearer who fell to the might of the Star Dragon. Dragon Princes were now all alone because their companions were delayed by the enemy fast cavalry.
Magic Phase Details:
Winds of Magic: 4,5 --> 9:5
Earthblood on himself: 2,3,4 + 4 = 13, no dispel attempt
Master of Stone at Loremaster: 2,6 + 4 = 12, no dispel attempt --> d6 = 4, 2 wounds, both ward saved
Regrowth: 1,2,3,4 + 4 = 13, dispelled on the roll of 1,2,3,4,4 + 2 = 15
Outcasts - Turn 4
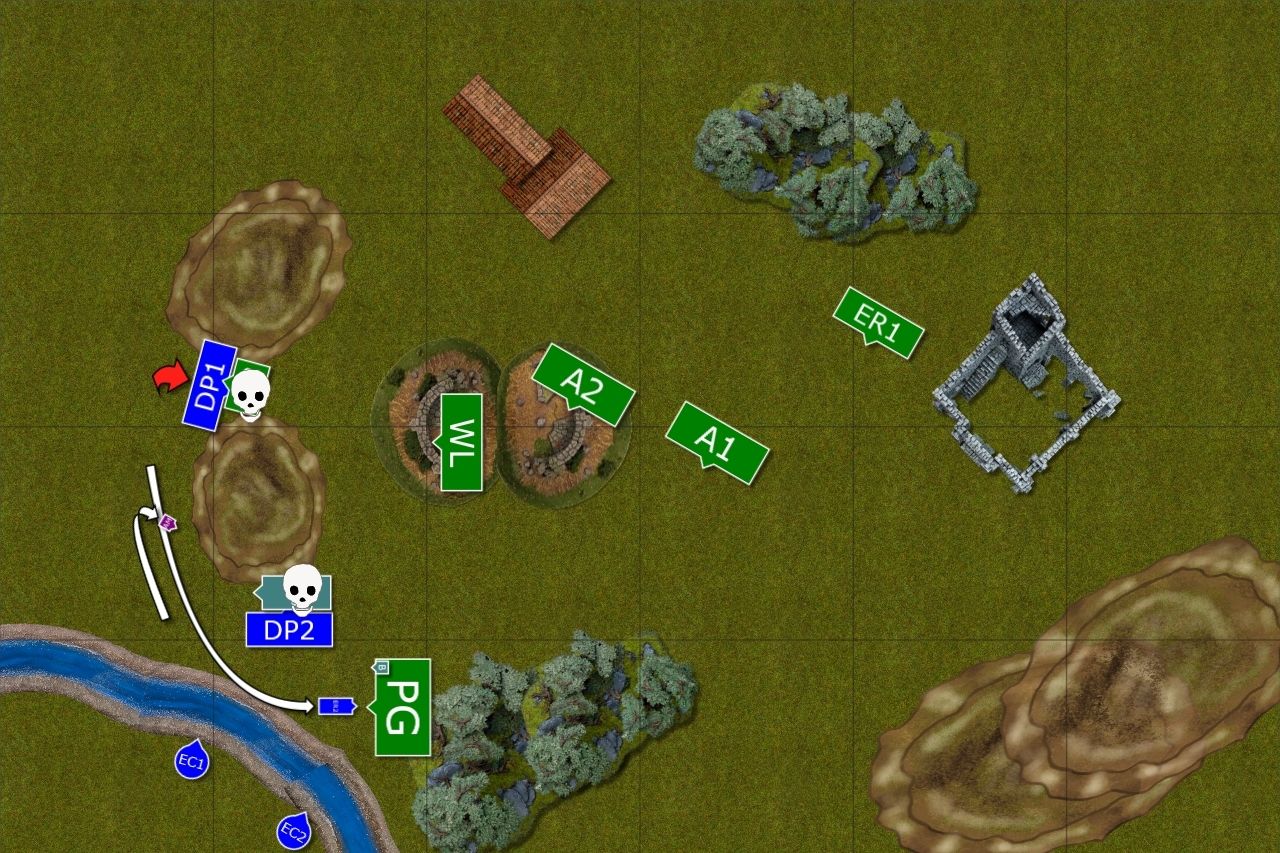
Star Dragon down!
It was the last chance to hunt down Star Dragon and minimize the margin of defeat as well as capture enemy general. Dragon Princes charged fast cavalry and reformed to help their companions but all they could do was to watch. Larry the Master of Paths did what he could to aid his knights but the winds of magic were low. And then the miracle happened! The knights fell the beast all by themselves and thanks to their magical banner the great wyrm didn't regenerate the wounds and finally fell down!
Magic Phase Details:
Winds of Magic: 2,2 --> 4:2
Touch of the Reaper at the Star Dragon: 1,2,3,5 + 2 = 13, dispelled on a roll of 4,6 + 4 = 14
(Edit: In the previous version that spell inflicted a single wound and then lore attribute could also result in a wound meaning the Dragon would have died on the spot. However, good roll to dispel saved the dragon until combat when it finally gave its final breath.)
Elves of Light - Turn 5
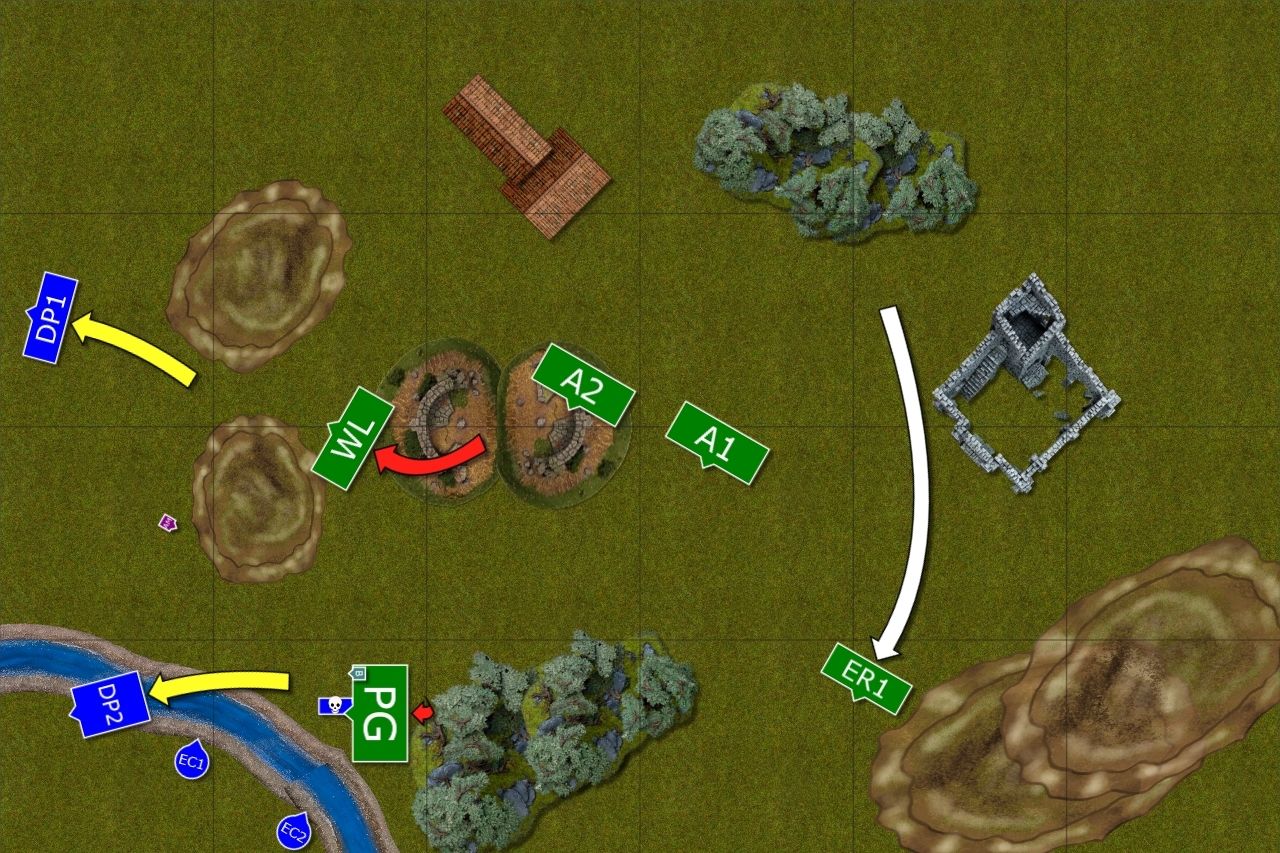
Tactical retreat
With the loss of their general and a dragon it was much harder to catch mounted Outcasts. The Archers also could not find the weak spot in the construction of their bolt throwers. Does that mean some of the Outcasts are going to escape?
Outcasts - Turn 5
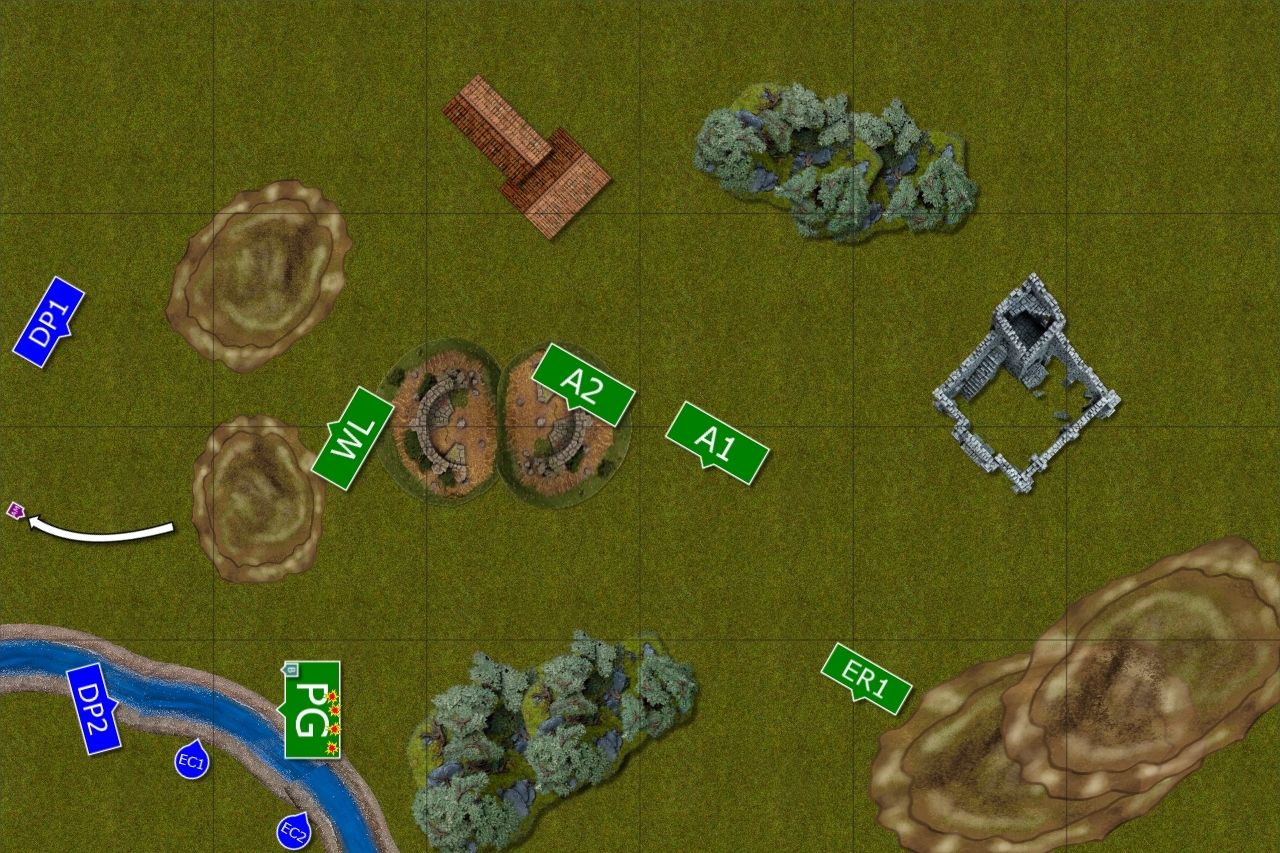
Getting ready for the last charge
Outcasts reformed with the very few units that were left. But they had one more trick up their sleeve. They decided to focus their efforts on the enemy Protectors of the Flame. Bolt Throwers released at them for the last time and a few warriors fell down. Master of the Paths used his magic to strip some defensive gear from enemy BSB and aimed at the warriors again but only one fell to the fireball. Now they had to wait for the enemy reaction to see if their last effort could pay off.
Magic Phase Details:
Winds of Magic: 1,5 --> 6:5
Miasma at Protectors: 3,4 + 2 = 9, dispelled on the roll of 1,3,4,5,6 = 19
Touch of the Reaper at BSB: 1,3 + 2 = 6, failed to cast
d6 Fireball at Protectors: 3,4 = 7, d6 = 4 --> 2 wounds, 1 saved
Elves of Light - Turn 6
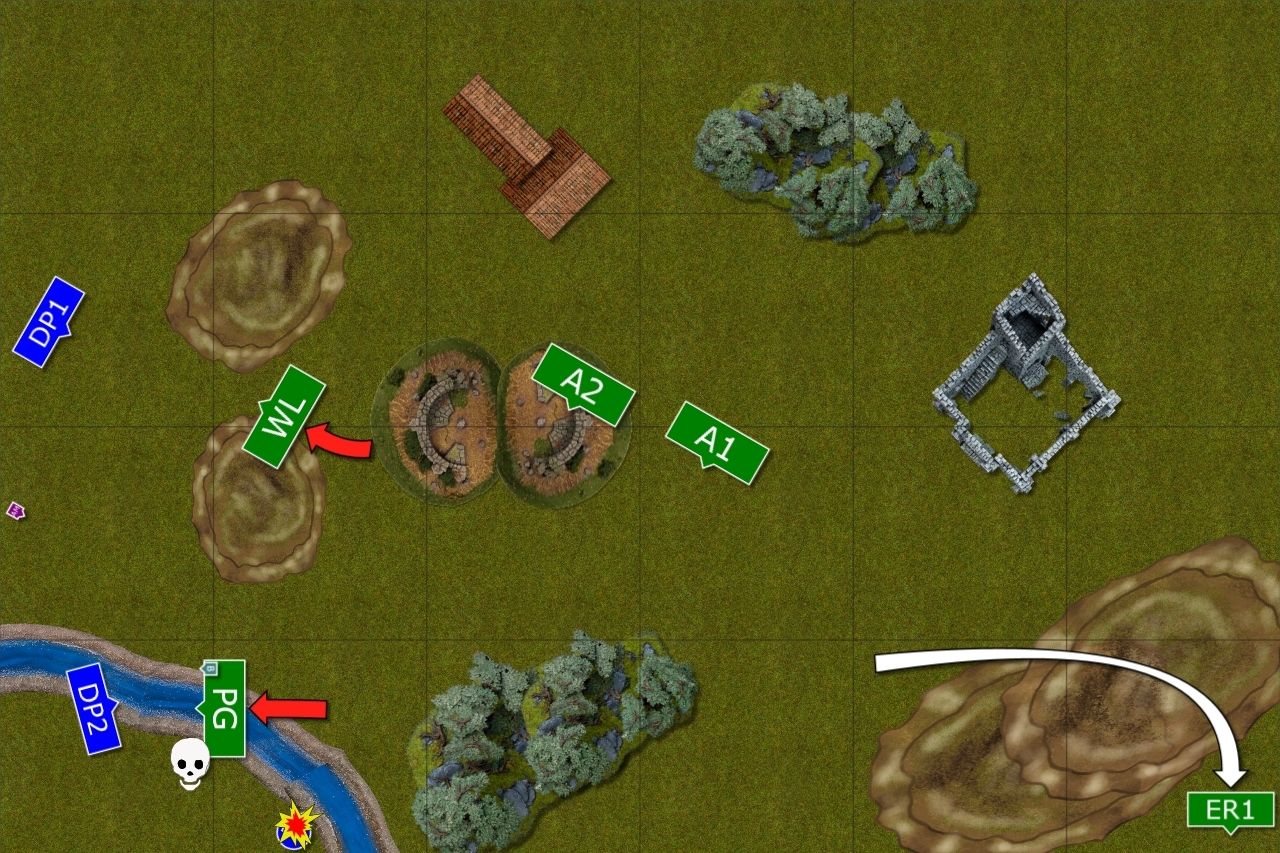
Last attempt to catch enemy knights
Lion Guard tried to reach enemy knights but could not make it in time. Protectors, however, destroyed one bolt thrower and stormed into nearby heavy cavalry. Will the be able to hold?
Outcasts - Turn 6
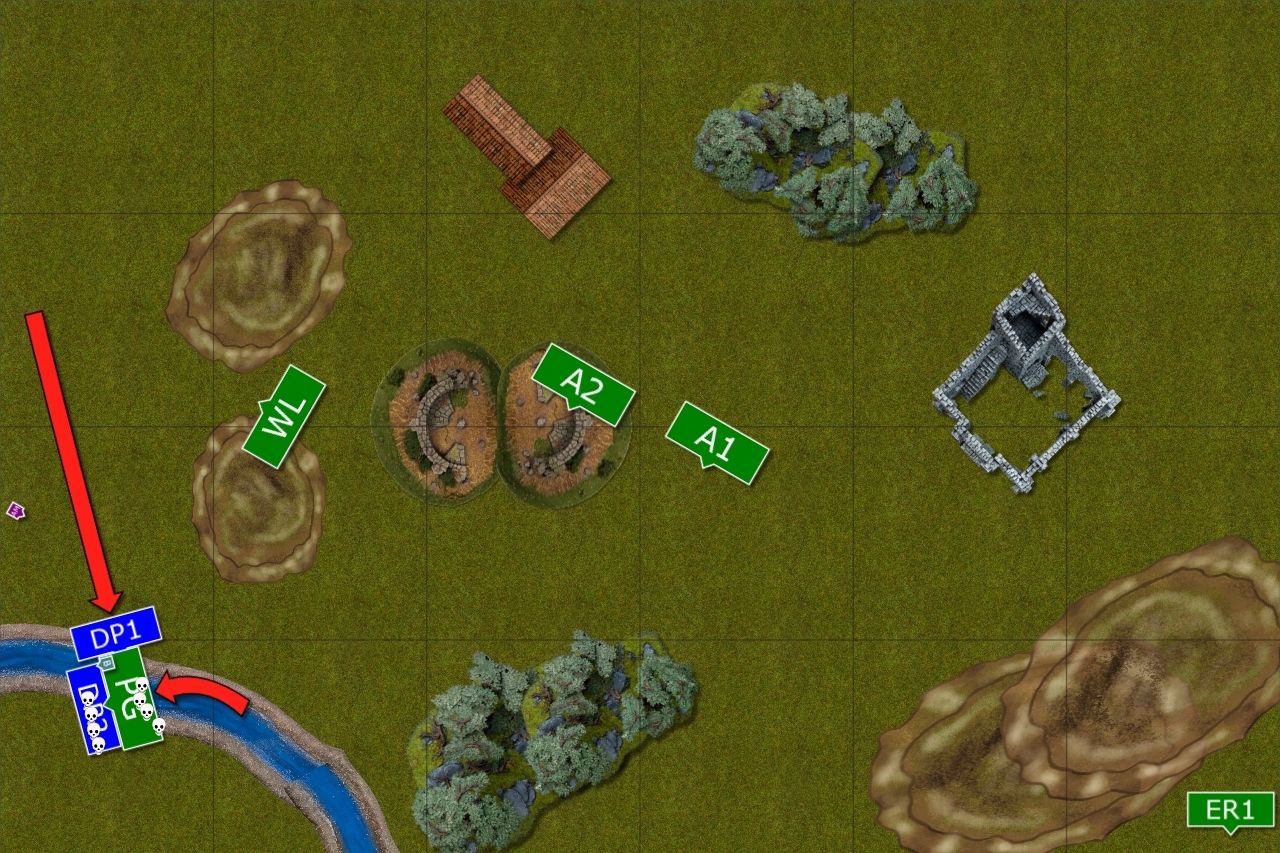
Last charge of the Outcasts!
The battle was surely lost but the last word belonged to the Outcasts. The Knights spurred their steeds and made that last charge into the flank of the Protectors. Suddenly the fight didn't look that one sided anymore and it could go both ways. Master of the Paths managed to inflict a single wound upon enemy BSB but the Knights could not finish him off. Warriors fell on both sides and in the end the Knights lost the combat by the narrowest margin but they didn't break.
The battle was over and this time Outcasts had to acknowledge that their opponents outsmarted them and withdrew with few remaining units to regroup.
Magic Phase Details:
Winds of Magic: 2,6 --> 8:6
Blizzard at Protectors: 3,4,5 + 2 = 14 --> dispelled on the roll of 1,3,4,6,6,6
Touch of the Reaper at BSB: 4,4,6 + 2 = 16, 1 wound saved with the Golden Crown but 1 wound inflicted due to (old) attribute
Miasma at Protectors: 1,1 + 2 = 4, failed to cast
Summary
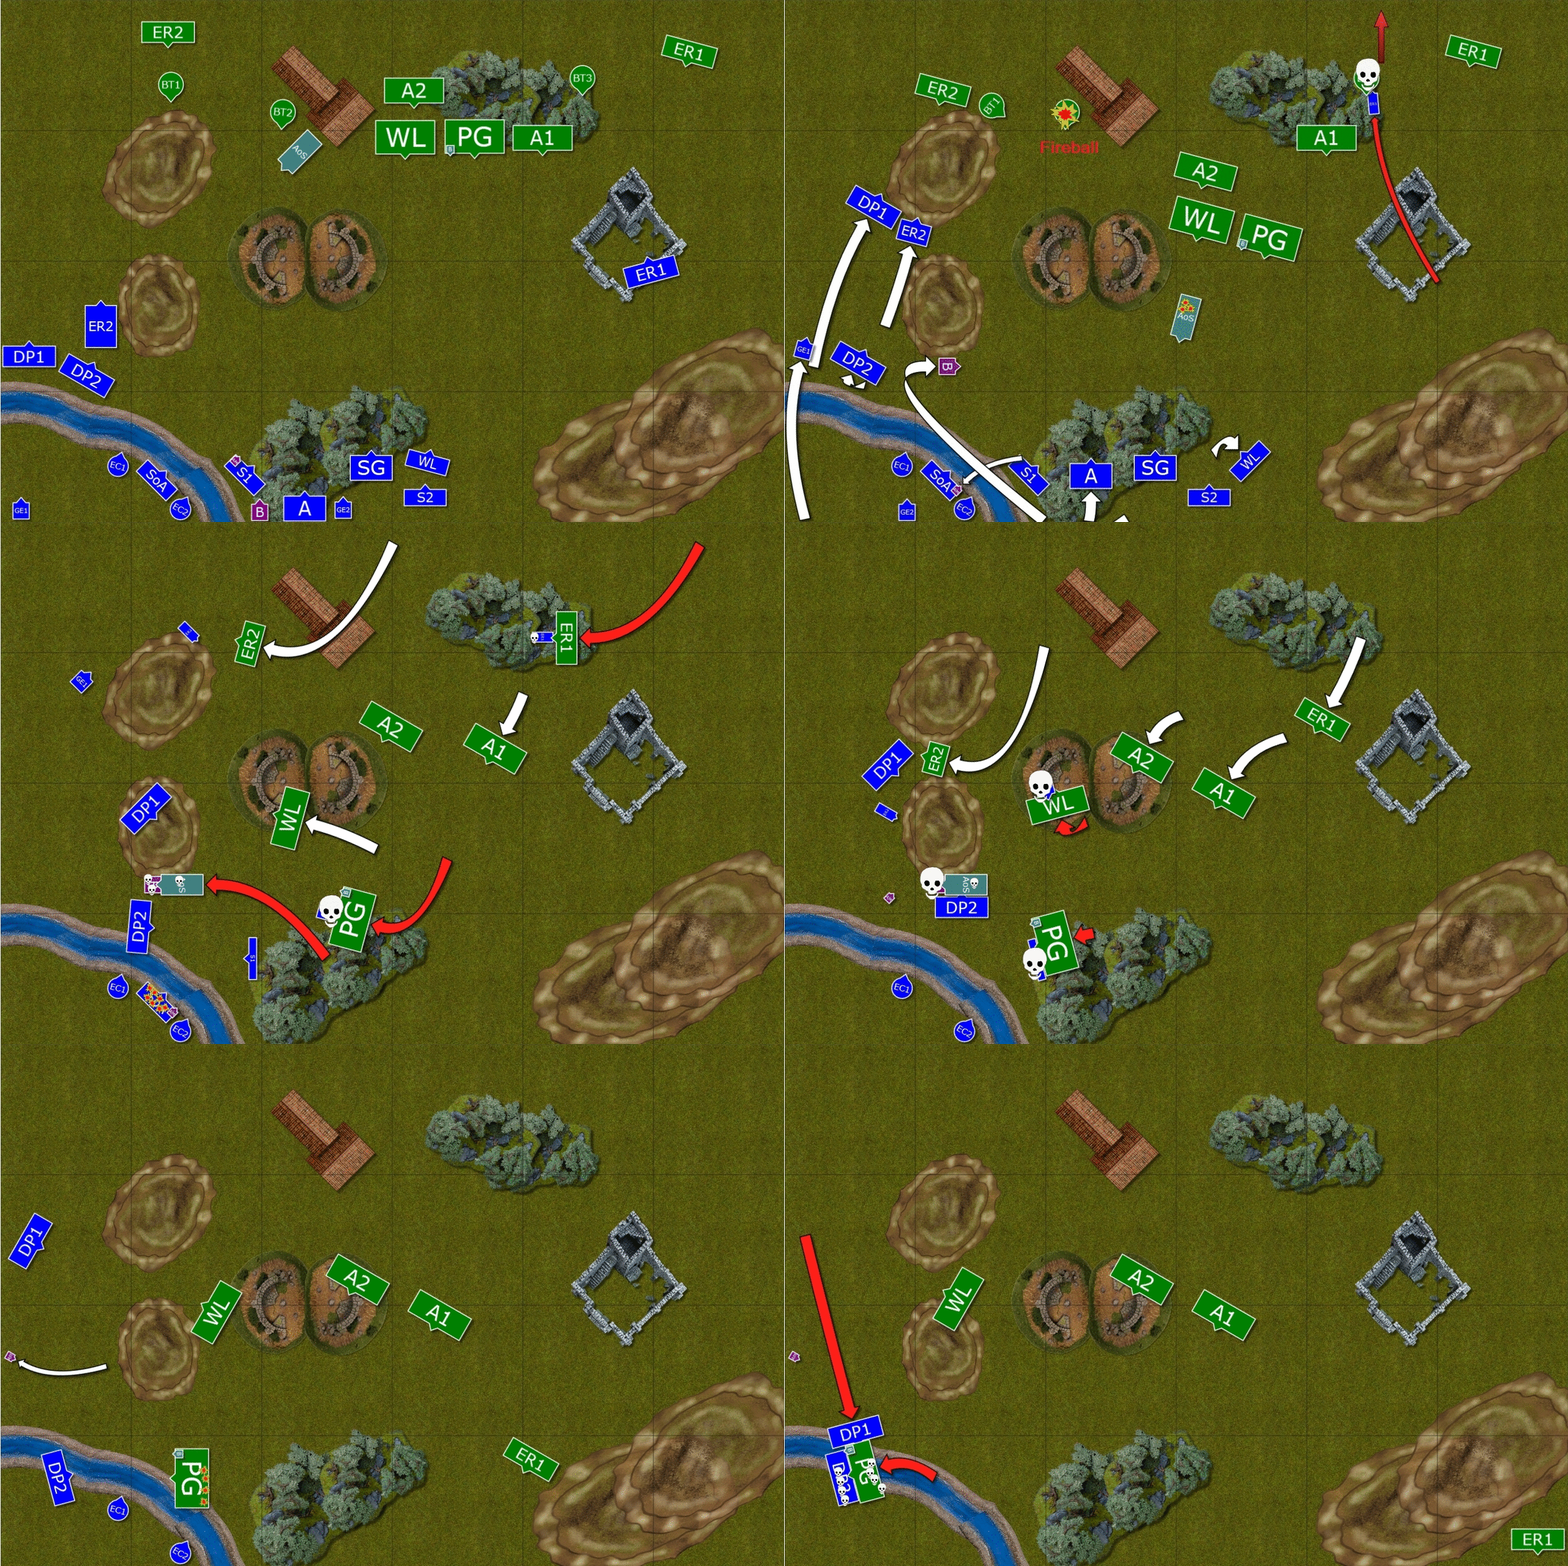
Turn-by-turn summary
After-battle thoughts
First of all I would like to thank Eltharis for a great game and congratulations for well deserved victory! He definitely played a better game and made me pay for my huge mistakes
I believe I put up some fight despite the losses and in fact I was close to making that defeat much less sore! If only the plan of winning against protectors and breaking them worked! In the end I lost by around 1200 VP which is a Major Defeat according to 9th Age rules. That last combat, if worked for me, would have brought the margin of defeat to 400+ points so it was definitely worth trying. It is simply good to know that despite the heavy blows at the start I was able to get some points back.
I really like how Eltharis commanded his army. He was aggressive in approach, was ready to exploit the mistakes I made but kept his options open. He also made sure his Lions were nearby to provide stubbornness and I really had to inflict quite a substantial number of additional wounds to the dragon to take it down. Life magic worked wonders on this model.
Looking at it again I believe the idea of refused flank was good but I messed up the deployment. I should have put my Archers and Sea Guard as well as Swordmasters on the bank of a river to form a defensive perimeter and prevent attacking infantry from getting rank bonus.
Bolt Throwers and Lions could stay in the forest. Thanks to that I could have a good defensive position, have cavalry going through the flank and made the distance to my army longer. I was going second too so I think I should have positioned right reavers better. I got lucky that they survived and that I didn't fail DT test as well that I managed to kill bolt throwers with single riders.
The biggest mistake was, of course, leaving Sea Guard in the forest. I really can't explain why I did that. I am also sure there was a way to keep the BSB nearby too so I could try to prevent both units from running away. Archers failed on a re-roll but maybe Swordmasters would not. Next, I decided to charge with 2 regiments against Star Dragon and made my own situation even worse. Another stupid mistake and both cost me the game. I simply lost 5 units in one go there. Again, no idea why I did that.
On the other hand I am glad how I tried to mitigate the margin of defeat. I managed to prevent some of the more important spells from being cast (such as Regrowth) and if I remembered about my Charmed Shield then who knows, maybe my BSB would actually survive
In the end I had that last chance to get Protectors and BSB but it didn't work out. I think there was something I could do better. First of all I picked too few dice to cast Touch of the Reaper in 5th turn, should have cast it with 3 dice. That would be 1 wound. Then repeat it next turn as I did and get BSB.
That would allow to direct more attacks at Protectors because in order to kill BSB (and that failed), I directed 4 attacks from the Knights and 3 attacks from the steeds. All these could have been then used to inflict more damage and to actually break steadfast.
We definitely forgot about the river and possible disruption to rank bonus and it also seems that full rank of Dragon Princes would get +2 bonus from flank attack. It wouldn't have changed the outcome of the combat though but I decided to mention it as these are some of the new rules that actually got into play too.
I hope to organize some re-match with Eltharis as I really think he deserves a game where I don't make that many mistakes
9th Age Impressions
I would also like to add, as usual, some comments about 9th Age rules that we used in this game.
1. Deployment
I think the new way of deploying regiments (i.e. ability to deploy more than 1 unit) is a very interesting idea and I am looking forward to trying it again in future games.
I like the method of new deployment zones as well as secondary objectives. I didn't play well enough in this game to even think about scoring some more points for these but it is definitely good to have them as that adds to the variety of the battle. It will hopefully make the games more interesting and not always about killing the most of the enemy.
2. Magic
New idea for Overwhelming Power needs some getting used to. First of all it does not always mean you can get the spell in as the total result might not be high enough to prevent the enemy from dispelling it. On the other hand I noticed a tendency to cast spells with maximum 3 dice, in particular in the case of a wizard on a ridden monster (more on it later). That creates an interesting dynamics because it is far more risky to try and push for that one spell. It does not have to be anything big here. Just the one that is quite important to have.
At the same time casting spells for the Master of the Paths may be more problematic if the casting value is higher. Boosted versions of the default spells might not be game changing but require 4+ dice to be used and that is huge risk for a level 2. I noticed that that leads to the situation where I try to cast many spells instead of few with more dice but unless I have significantly more power dice than my enemy I have smaller chance to get anything through.
3. Ridden Monsters
I like the monsters we used. Griffon Rider is very good now (please, remember it was before Beta versions of army lists), should be harder to harm by small arms fire. It does not allow to protect points as before though, i.e. if your rider survived then you could hide him and thus don't give up points. But it is not a disadvantage, just an observation that it is harder to kill it with low Strength attacks but might be a little easier with something big.
On the other hand a wizard on a dragon is a huge thing. First, when casting spells with 3 dice all the feedback hits might not even scratch the model. S5 against T6 or 7 of a Star Dragon is not going to make much of an impact. And I don't think a player will risk 4+ dice as a miscast takes off the whole model. I am not quite sure why one would mount a fighting lord on such mount though, since having a wizard there seems like much better idea. Especially if he chooses path of magic that allows some kind of healing.
I hope you liked the report!
Thanks for reading and I am looking forward to your comments!
Cheers!

