
Been a while since I did a Youtube report! Here's a game I had about two weeks ago, featuring one of my early attempts at meshing a Flamespyre Phoenix Anointed into a more 'all-comers' list.
This one features a Coven-style variant. I have other variants I've played around with and might post up here as well, if people are interested.
Anyway, enjoy!
https://www.youtube.com/watch?v=R1aSq3b7Ibc
Axiem
2500 HE Flamespyre v. Wood Elves Battle Report
Moderators: The Heralds, The Loremasters

Re: 2500 HE Flamespyre v. Wood Elves Battle Report
Great report. Well done, easy to follow and not too long. Post up more, I'm interested to see your Flamespyre Annointed results in game.
-
Swordmaster of Hoeth

- Southern Sentinel
- Posts: 4480
- Joined: Thu Jul 01, 2004 9:01 am
- Location: On the path of an outcast
Re: 2500 HE Flamespyre v. Wood Elves Battle Report
Hi Axiem,
Thanks for the report! I have a few questions/comments, if you don't mind:
1. How long does it take to prepare video report? Why do you prefer it over written version?
2. For the future reports, would it be possible to get a photo of the entire table as well? I know it might be time constrain issue but if you showed it first and then moved to explain particular areas I believe it would have helped to see it in the context of the situation on the table.
3. It seems your opponent committed his Wild Riders too early. In the case of the unit that attacked Frosty it also seemed that adding dryads helped you more than him as he was thunderstomped. Do you think it would have been better decision for him to charge you with WR alone? Would you still hold against that charge?
4. It looks like WR could have still wheeled after finishing reavers and overrunning into Lions so that they would have not been the closest target of the mysterious terrain effect. Is that correct observation? I must admit it was a pity that combat ended before it really happened.
5. You positioned Annointed corner to corner with WR while attacking from the flank. But there were no units behind them to overrun into so what was the reason for such positioning?
6. You have mentioned that at some stage you had 80% board control. Could you elaborate what do you mean by that?
Thanks!
Twitter @SwordOfHoeth
High Elves MSU - Observations
Rabidnid wrote:Are you seriously asking someone called Swordmaster of Hoeth why he has more swordmasters than white lions? Really?
Re: 2500 HE Flamespyre v. Wood Elves Battle Report
Glad you enjoyed! I'll get them up as soon as I can!Great report. Well done, easy to follow and not too long. Post up more, I'm interested to see your Flamespyre Annointed results in game.
Best estimate, all said and done, is about 6-7 hours of work. That includes uploading, video editing, etc. I don't prefer it over the written ones - they're both equally interesting for me to work on. However, it seems different people have different styles they like, and I'm happy to appease both groups, provided I have the time, and they are willing to wait months between uploads if need beThanks for the report! I have a few questions/comments, if you don't mind:
1. How long does it take to prepare video report? Why do you prefer it over written version?
Ugg yes... It's something I'm trying to work on, but I tend to forget when I'm playing the game! It'll get better, I promise!2. For the future reports, would it be possible to get a photo of the entire table as well? I know it might be time constrain issue but if you showed it first and then moved to explain particular areas I believe it would have helped to see it in the context of the situation on the table.
Still would have held. Even with Wyssans and the damage that he caused, it would have been a drawn combat, and I'm happy to commit the Phoenix to tie up the Wild Riders instead of having them run around my back lines. As I said in the report, I felt like I was ahead before we started, having more, and more scary, combat elements than my opponent. I was happy enough taking combats that weren't point-effective for me, because across the entire army, I didn't feel like I could fall that far behind, so long as I didn't do anything risky.3. It seems your opponent committed his Wild Riders too early. In the case of the unit that attacked Frosty it also seemed that adding dryads helped you more than him as he was thunderstomped. Do you think it would have been better decision for him to charge you with WR alone? Would you still hold against that charge?
Can't wheel on an overrun - has to be directly forward. And yes, it was a bit of a pity! Hopefully I'll be able to showcase a game where they actually do something impactful! I've felt their damage before, and 15-16 casualties is about what I can expect.4. It looks like WR could have still wheeled after finishing reavers and overrunning into Lions so that they would have not been the closest target of the mysterious terrain effect. Is that correct observation? I must admit it was a pity that combat ended before it really happened.
So that I could reform after combat, with my center being as close to my opponent's line as possible. Gives an extra inch or two, and is generally good play with the Anointed, especially later when the Flamespyre is weakened, and every inch matters for deciding how effective Rise from the Ashes can be.5. You positioned Annointed corner to corner with WR while attacking from the flank. But there were no units behind them to overrun into so what was the reason for such positioning?
Happy to! The comment was 80% of the usable board space, referring to the middle of the board (so excluding deployment zones) and was referencing to my turn 1, where the table looked like this:6. You have mentioned that at some stage you had 80% board control. Could you elaborate what do you mean by that?
Thanks!
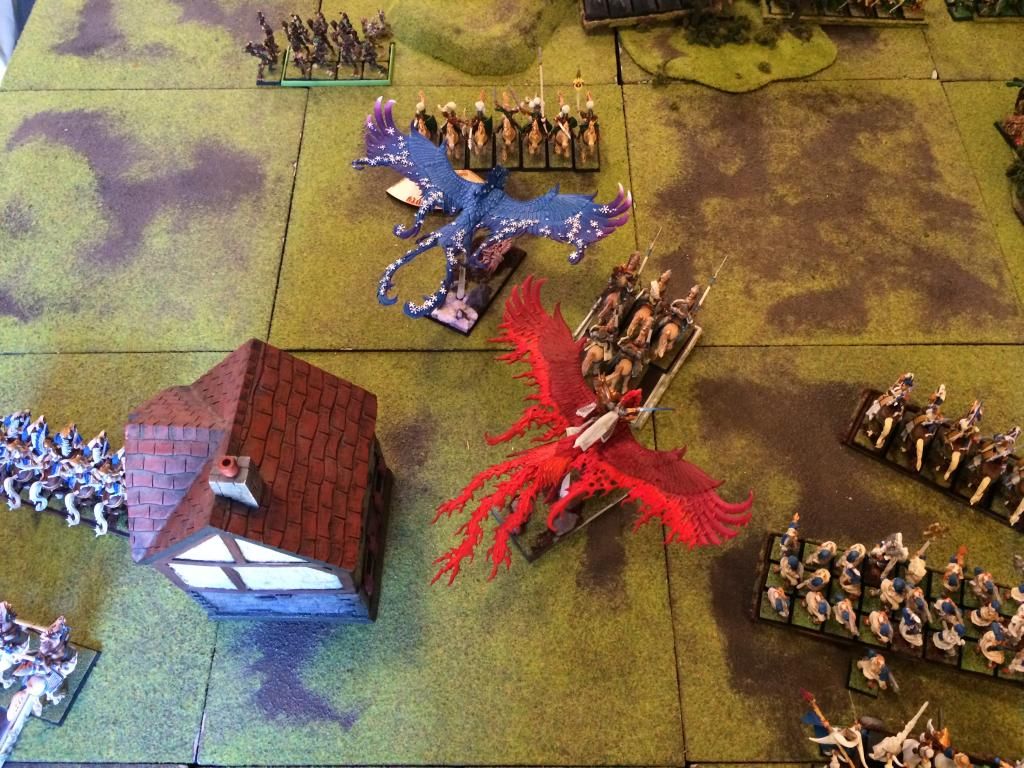
Left hand side.
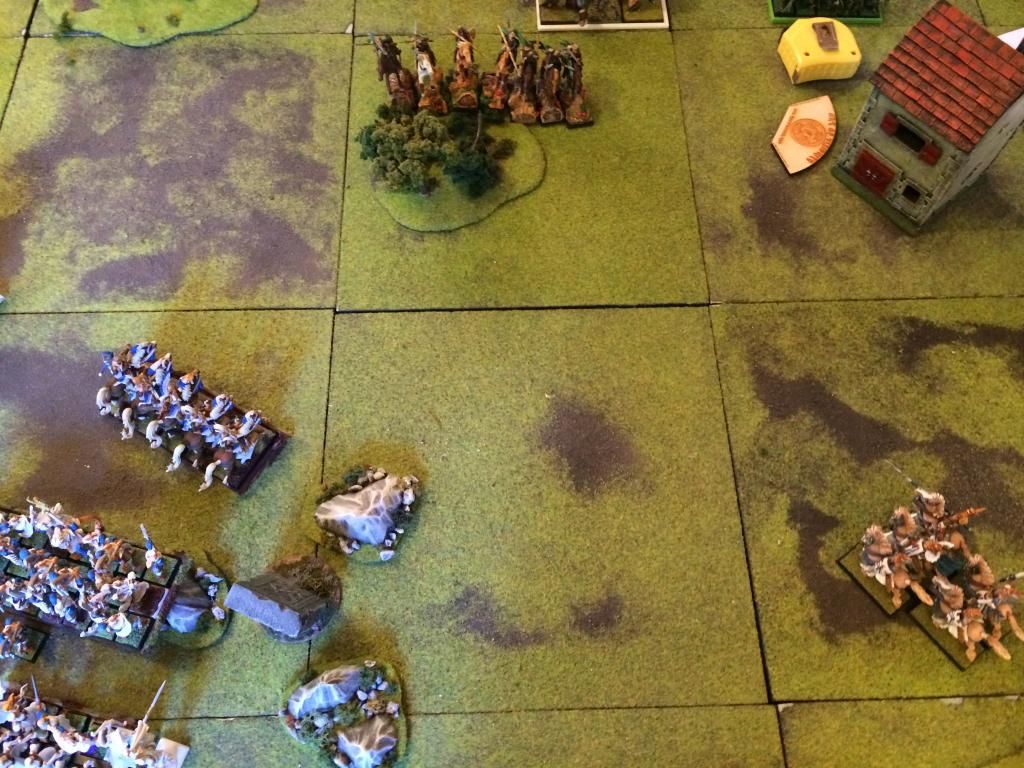
Right hand side.
At this position, I counted only two locations any of my opponent's units could move to (again, excluding deployments) which wouldn't result in a charge from me. The first was the Wild Riders, if they'd wanted to squeeze right next to the Anointed on Flamespyre, which would have both been tight and not terribly beneficial for my opponent. The second is behind the house on the right side with the other unit of Wild Riders, which is a very defensive move and doesn't help advance my opponent's plan. Any other advancing movements, beyond an inch or two, would have resulted in a charge by one of my Phoenix, Helms, or Lions (Reavers could have sacrifice-charged out if needed). I was also exerting a lot of pressure on my opponent's deployment zone, which mean he had to move out into space I was threatening.
I generally only count the middle boards when talking about 'board control' seeing as how those are really what is being fought over. It's the same as chess, where the whole game is basically played around the middle four squares. This is what I meant by the comment, which was more a generalization then a representation of any actual % of flocked-table controlled.
Axiem
-
Swordmaster of Hoeth
- Southern Sentinel
- Posts: 4480
- Joined: Thu Jul 01, 2004 9:01 am
- Location: On the path of an outcast
Re: 2500 HE Flamespyre v. Wood Elves Battle Report
Hi Axiem,
Thanks for a very quick reply!
That is longer than I expected. I thought that video report might be quicker to prepare than the written one, in particular when you have to spend time to prepare diagrams in addition to photos. Good to know that you do not exclude the possibility for written ones then!
I know it can be hard to get that whole overview photo as well when you focus on the game but try to do all these zoom ins for the future report. If it is a friendly game or the one at a club maybe there is a chance for a friend to take photos for you? Alternatively you can add "photo shooting phase" at the end of each turn and quickly take one covering the whole table. In any case, that comment was more to tell you that it can be helpful but not absolutely necessary.
I don't want to debate rules so I will just say here that I have seen players wheeling to maximize the models while overrunning. If you want I can create separate topic to discuss it further. I am not necessary claiming you can but I assumed you do because I have seen it done before.
The situation with Frostphoenix was an example where I think your opponent committed his WR too early. He still had advantage in the shooting phase and some WE players use WR not as first wave striking force but as interceptors later on when the enemy is weakened by shooting and magic. It was definitely good situation for you to engage the most powerful combat elements of the enemy on your terms.
Thanks for explanation why Annointed was positioned that way.
Also, thanks for taking time to elaborate on board control percentage. Many terms in warhammer are used with different understanding by different players. It was interesting to see that the factors you included are:
- places where the enemy can move the units without being charged
- deployment zones being excluded
The first one corresponds to the area covered by arcs of sight of relevant units and the maximum distance of potential charge. However, that area overlaps partially with the relevant arcs of sight of the enemy units. How would you treat that in your board control assessment? I am sure it may vary depending which unit is under the potential charge area of particular enemy. For example, Frostphoenix would comfortably land in the area where dryads could attack (as you did in the report) and expand the control area as it can take the charge and beat dryads by itself. But I wonder if you take that into account in your analysis.
Thanks!
Twitter @SwordOfHoeth
High Elves MSU - Observations
Rabidnid wrote:Are you seriously asking someone called Swordmaster of Hoeth why he has more swordmasters than white lions? Really?
Re: 2500 HE Flamespyre v. Wood Elves Battle Report
I don't normally watch video reports but I was intrigued by the new concept doing the rounds and this was the first rep I think I've seen of it - at any rate since Furion's results - so I made an exception. I still prefer non-vid reports but it was well executed - thanks for doing it  .
.
I'd always played railroad straight over-runs (I've recently been introduced to centre-to-centre but can't remember if that applies here), but I'm sure it was on Ulthuan where someone showed me that you go railroad straight *unless* you clip a unit, in which case you are permitted (required?) to maximise, including a free wheel as required.
I'm up for querying it! I learn a lot of rules intricacies in the bat reps section rather than the rules section (I often seem to remember better too if they're in context of a battle).Swordmaster of Hoeth wrote:I don't want to debate rules so I will just say here that I have seen players wheeling to maximize the models while overrunning. If you want I can create separate topic to discuss it further. I am not necessary claiming you can but I assumed you do because I have seen it done before.
I'd always played railroad straight over-runs (I've recently been introduced to centre-to-centre but can't remember if that applies here), but I'm sure it was on Ulthuan where someone showed me that you go railroad straight *unless* you clip a unit, in which case you are permitted (required?) to maximise, including a free wheel as required.
The 9th Age: Alumni
Former Roles: Advisory Board, HR, Moderator and Highborn Elves Army Support
Former Roles: Advisory Board, HR, Moderator and Highborn Elves Army Support
Re: 2500 HE Flamespyre v. Wood Elves Battle Report
Glad you enjoyed! I'll try and put out some more written one's soon! Time, of course, being the only inhibiting factor!I don't normally watch video reports but I was intrigued by the new concept doing the rounds and this was the first rep I think I've seen of it - at any rate since Furion's results - so I made an exception. I still prefer non-vid reports but it was well executed - thanks for doing it
I don't usually do digraphs for my picture reports, just the pictures themselves. I could also probably get the YouTube reports down to 3-4 hours after some more practice doing it, but it still takes a lot of time. Particularly the most time consuming is going through selecting the pictures I want to use, them marking them with turn numbers and getting the order sorted out. I generally take 50-60% more pictures than are showing up here, and only use the best ones.That is longer than I expected. I thought that video report might be quicker to prepare than the written one, in particular when you have to spend time to prepare diagrams in addition to photos. Good to know that you do not exclude the possibility for written ones then!
I've seen it too, but it's wrong, at least rules as written. A new topic would be fine too if you feel it needs more discussion. BRB pg. 58 says "If the victorious unit charged into combat and the enemy was wiped out, it can move 2D^ inches straight forward." I don't think there's much wiggle room in allowing for a wheel there.I don't want to debate rules so I will just say here that I have seen players wheeling to maximize the models while overrunning. If you want I can create separate topic to discuss it further. I am not necessary claiming you can but I assumed you do because I have seen it done before.
This doesn't happen on overruns, only when the enemy breaks and flee, in which case the direction is center-to-center. Clipping is perfectly legal on both overruns and pursuing into new enemy, although you have to Close the Door in a way that maximizes models, if there's any possibility that you could do otherwise (hitting a corner for example).I'd always played railroad straight over-runs (I've recently been introduced to centre-to-centre but can't remember if that applies here), but I'm sure it was on Ulthuan where someone showed me that you go railroad straight *unless* you clip a unit, in which case you are permitted (required?) to maximise, including a free wheel as required.
Yes, I think there was a lot to be said for everything moving back and into the corners of my opponent's deployment. However, this essentially gives me a, if different, win condition where my opponent has split himself in half. Providing I can constrict his movement the following turn, which I should be able to do thanks to the Phoenixes and Cav, I could fairly easily capture about half of my opponent's army before he could react with the other half. I think this mainly boiled down to a deployment error on my opponent's part: he should have concentrated on one side, probably the side with the house, which would have given him plenty of places to run to. Similarly, a deployment like this would have reduced the likelihood I could reach my opponent's lines T2, giving him more time to shoot at me.The situation with Frostphoenix was an example where I think your opponent committed his WR too early. He still had advantage in the shooting phase and some WE players use WR not as first wave striking force but as interceptors later on when the enemy is weakened by shooting and magic. It was definitely good situation for you to engage the most powerful combat elements of the enemy on your terms.
Thanks for explanation why Annointed was positioned that way.
If the areas overlap by opposing units, I use which one should win the ensuring combat as the deciding factor. For instance, the Wild Riders threatened some of the center of the board (the ones on the right, second picture) but they didn't stand a chance against the Lions, something I pointed out in the video. I might loose a rank or two, but I would easily win that combat, meaning I had control of the space, not my opponent. Why does this matter? Because a unit really isn't "threatening" a portion of the board, if it doesn't have an answer when I push up into the area it is supposedly controlling.Also, thanks for taking time to elaborate on board control percentage. Many terms in warhammer are used with different understanding by different players. It was interesting to see that the factors you included are:
- places where the enemy can move the units without being charged
- deployment zones being excluded
The first one corresponds to the area covered by arcs of sight of relevant units and the maximum distance of potential charge. However, that area overlaps partially with the relevant arcs of sight of the enemy units. How would you treat that in your board control assessment? I am sure it may vary depending which unit is under the potential charge area of particular enemy. For example, Frostphoenix would comfortably land in the area where dryads could attack (as you did in the report) and expand the control area as it can take the charge and beat dryads by itself. But I wonder if you take that into account in your analysis.
The rest of your paragraph is correct - and yes, that's exactly what I'm taking into account when deciding who has the upper-hand when it comes to board control.
Axiem
-
Swordmaster of Hoeth
- Southern Sentinel
- Posts: 4480
- Joined: Thu Jul 01, 2004 9:01 am
- Location: On the path of an outcast
Re: 2500 HE Flamespyre v. Wood Elves Battle Report
Thanks for the replies, Axiem. I am looking forward to reading the written reports too!
Twitter @SwordOfHoeth
High Elves MSU - Observations
Rabidnid wrote:Are you seriously asking someone called Swordmaster of Hoeth why he has more swordmasters than white lions? Really?